Weather Station Project: Lesson 8

Formatting with Google Apps Script
Introduction
In the previous lesson, we used the split function to split the date and time information. This function works for all the data up to the last cell in the sheet. The last cell is typically cell 1,000 for new sheets. New date information added beyond this cell doesn't have the function applied. This isn't a problem unless we expect to gather lots of data.
We need to manually copy the function down the new rows if we plan to collect lots of data. That is one way to update the cells. Another way is to do with programmatically. This involves adding a small program to our spreadsheet.
Here is a disclaimer. You don't have to go through this lesson if you plan on having a short run of the weather station. This really all depends on how much data you want to collect. Collecting data every thirty-second is really too much. I would say that collecting sensor information every half-hour to one hour is a little more reasonable.
Collecting data each hour will use up the one-thousand rows in about six weeks. Collecting sensor data every half-hour will fill the rows in half that time. One-thousand rows are therefore good for three to six weeks worth of sensor data. More data requires more rows. Google sheets will automatically add more rows as needed. The split function and temperature conversion are not automatically applied to the corresponding new data.
This happened to me while creating the lessons. I left the code running most of the day and the data went into well over two-thousand rows.
Gathering data from the sensor every 30 seconds is not the best. We will adjust the time interval later. I will keep the code set to 30 seconds for now so we can build the graphing tools.
The formatting needs to be updated as new data is added. To automatically update the function for new rows I want to create an app script. The app script will run at specific intervals.
The script
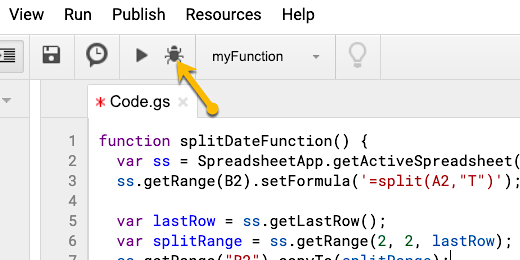
Google includes a script editor option for most of its applications. The script editor is available in the Tools menu. Open the piweatherData spreadsheet if it isn’t already open. Click Tools and select Script editor.

The code editor opens in a tab to the right of the spreadsheet. The code is created within functions. Google Sheets has one function ready for us to use. App scripts and functions are created in projects. The project is currently untitled.
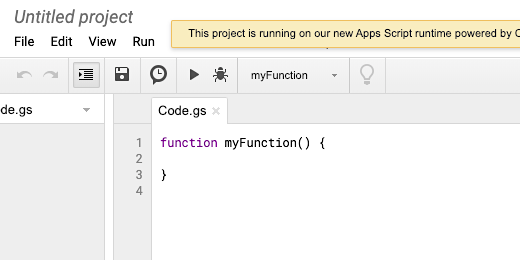
Click the Untitled project name.

Name the project splitDate.

The function of the project is titled myFunction. Change the function name to splitDateFunction.

The code in Google Apps script is case sensitive. The code needs to be typed with the appropriate upper or lower case characters. Errors in the code are often the result of forgetting to properly format the commands. You can copy and paste the commands from my instructions. As always, I encourage you to type out the commands. Doing is learning.
The first command selects the application for the function to use. The application in our lesson is Google Sheets. Our code is created within the opening and closing curly brackets. Click once after the opening curly bracket and press the return key.
Type SpreadsheetApp. Note the upper and lower case letters. This is called a class. We have instructed the function to use the SpreadsheetApp class to call the spreadsheet program.

We begin with a chain of connections to other classes. The first step is to call the spreadsheet application class. The next step is to call the active spreadsheet. The active spreadsheet is the one we are working on. Type a period followed by the word get.

The Apps script editor is helpful. It provides a list of available classes that relate to the spreadsheet app.
We want to get the active spreadsheet. We can continue to type the command or use the down arrow key on the keyboard to select the class we need. Continue typing getActiveSpreadsheet. The getActiveSpreadsheet class is the only one that is left. Press the Return key to finish selecting the class.

We want to get a specific sheet in our spreadsheet. The sheet with the date information is on the sheet named sensor data. Type a period followed by the word getSheet. We want to get the sheet by its name. Make sure getSheetByName is highlighted and press the Return key.

The name of the sheet we want to use needs to be placed within the parenthesis.

Type ‘sensor data’ within the parenthesis. Include the single quotations around the sheet name.

We are going to end this part of the code here. Type a semicolon at the end of the code. The purpose of this line is to select the sheet we want to use.

Return to the beginning of the line. Type var ss = at the beginning. This creates a variable called ss. The active spreadsheet and sheet information are placed in the variable ss.

Go to the line below this code. We are going to use the variable we created to perform the next step.
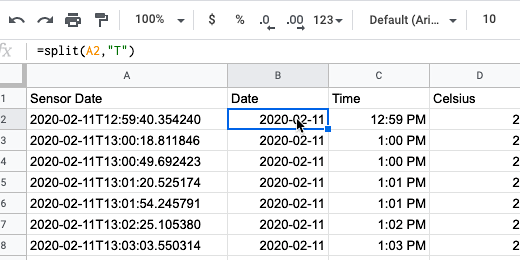
Take a look at the spreadsheet and the sensor datasheet. We want to set the split function in the first cell. The first cell for the split function is B2. The function is already here. The goal is to replace the function in the cell with the code we are creating.
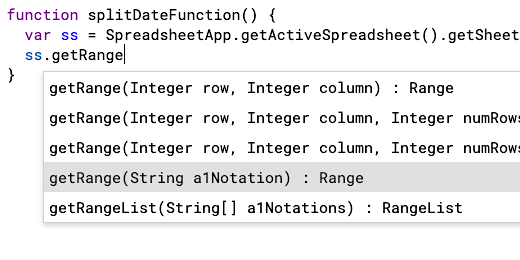
Type ss.getRange. The ss variable is used to get the range in the sensor datasheet. There are several Range options.
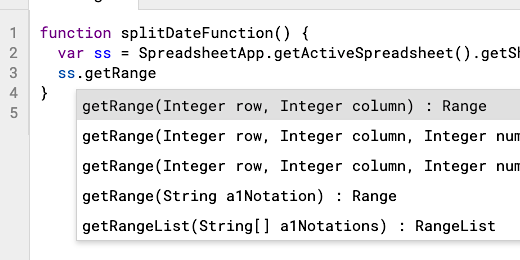
We want the range that gets a range using string notation. String notation is used when referencing a cell with a letter and number. Use the down arrow key and highlight getRange(String a1Notation). Press the Return key.
Replace the notation within the parenthesis with B2.

Type a period followed by setFormula. Use the class setFormula(String formula).

The spit function goes inside the parenthesis. Type (‘=split(A2,”T”)’).

Finish this line of code with a semicolon. Press the Return key to add another line.
We want to determine the last row with data. There is a class to do this for us. We are going to store this information in a variable.
Type var lastRow = ss.getLastRow();
This gets the last row with data in the data sensor sheet. The location is stored in the variable lastRow.

Press the Return key for the next line of code. We need another variable for the cell range from the first cell to the last. This Range information will be used to place the split function into each cell in the range.
Type var splitRange = ss.getRange. There are several Range options. We want the second option.

We need to identify the starting row and column for the first two parameters. The third parameter is for the number of rows to select.

Go to the piweatherData spreadsheet. The function to split the date and time is in the second row and second column.

Place the number 2 for the row and column parameters.

The parameter for the number of rows references the total number of rows with data. We have this value in the variable lastRow. Replace numRows with lastRow. Finish the line with a semicolon.

Press the Return key for a new line. Type ss.getRange(“B2”).copyTo(splitRange);.
The variable splitRange contains the cells beginning at cell B2 and ending with the last row with data. The Range information is something like B2..B1036. In this example, B1036 is the last row with data.
This line gets the function we placed in cell B2 and copies it down the column to the last row with data.

The code is done. All we need to do now is run it. Before running the code we are going to check and make sure there are no errors. Make sure all the lines end with a semicolon. Check the spelling of all the commands and variables. Commands and variables are in different colors. The colors will give you a hint if there is something wrong.
The editor has a program checker. It is called the debugger. The button has a bug for an icon. Click the debugger icon.
The debugger needs to run the code. Google needs your permission. Click the Review Permissions button.

Click the account used for the spreadsheet and script. A message appears informing you that the app isn’t verified with Google yet. Click the advanced link.

It references the name of the function that will run. Click the Go to splitDate link.

Click the allow button so the function we created can access the spreadsheet in Google Drive. No error messages will appear if everything goes well. If there are error messages you will need to check the code for mistakes. Run the debugger until you find all the mistakes. Check the cell references in the function.
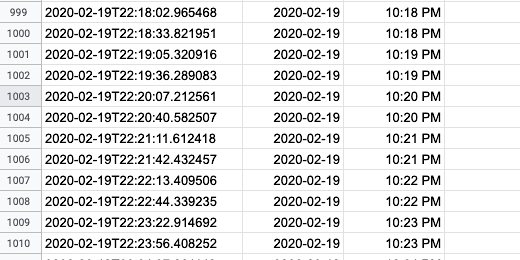
Here is my sensor datasheet. The date and time information is split up until the 1000th row.

Click the Play button in the script editor button bar.

The date and time information is split down the column until the last row with date information.
Update Fahrenheit conversion
Our Fahrenheit conversion is suffering from the same problem. The last conversion took place on the 1000th row. We need to automate the conversion here too.
Coding might be a challenge to learn at first but it makes the creation of tasks easier. In this example, we don’t need to write a new script to handle the Fahrenheit conversion. We will use the same function and adjust it to fit our needs.
Return to the code editor. Highlight the function from the word function to the last closing bracket.

The code in my editor works fine but isn’t formatted properly. The function name is indented a couple of spaces. The rest of the code is out-dented within the function. It should be the other way around. Press the Tab key while the code is highlighted. This instructs the editor to format the code. The code within the function is indented within the function. Yup, another teachable moment.

Keep the code highlighted and copy the code. The menu doesn’t have a copy option. You will need to use the keyboard commands Control+C or Command+C. Click once after the last closing bracket. Press the Return key twice. Past the code. Press Control+V or Command+V to paste.

We have two functions that do the same thing. Change the function name from splitDate to fahrenheitConvert.

The Fahrenheit conversion is in the same sensor datasheet. We don't need to change this line of our code. The conversion formula is in cell E2. We need to change the getRange parameter to E2.

Change the formula in the setFormula parameter to =D2*9/5+32. Change the single quotes to double-quotes.

The formula is in the second row and fifth column. Change the column parameter in the splitRange variable to five.

Change the getRange parameter in the last line from B2 to E2. Click the save button.

We have two functions now. We need to select the new function before running it on the sheet. Select the fahrenheitConvert function.

Click the Play button. The conversion formula is copied to the remainder of the cells. We didn’t run the debugger here because the changes we made won’t be caught by the debugger.
Triggers
The process is semi-automated. The code will update the formulas in the cells. This still requires that we open the spreadsheet, open the code editor, and press the play button. The goal is to completely automate the process so the formulas are updated on a regular basis.
Google has an automation process called triggers. This is similar to a process we will use in a future lesson to schedule the Python script. Click Edit in the code editor. Select "Current project's triggers".
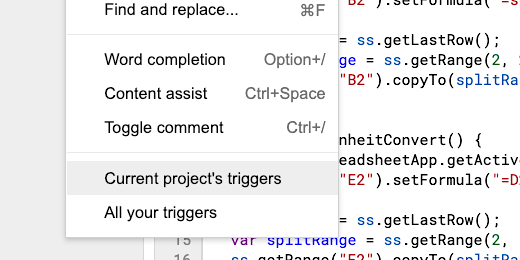
A tab is opened to the right of the code editor. This tab is opened to the Google Apps Scripts triggers portal. We are going to create a trigger to schedule the functions.

Click the Add Trigger button. It is found in the lower right corner of the page.

A trigger configuration panel opens. The triggers are linked to our Google account. Any function created under the account is available as a trigger. The splitDate function is selected.

Click the selector to reveal the other function. Leave the splitDate function selected.
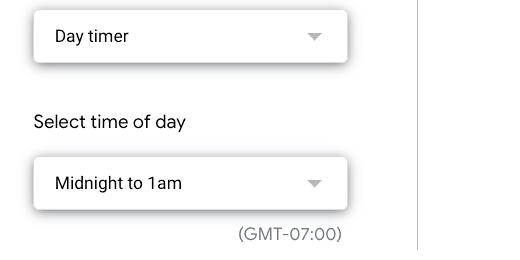
Go to the Select event source option. Click the selector and choose Time-driven.

The options update with selectors for the time-based trigger.
A thousand rows will hold data for 42 days when we update the data every hour. This is enough for about six weeks. I have done some rounding in my math. It is actually 41.66 days.
There are several trigger options. I don't want to schedule it too often. I don't want to schedule it where days go by without an update either. If I schedule it on a weekly basis the extra decimal place will eventually catch up with me. This is why I am choosing the daytimer option.
The daytimer option includes a time of day selector. The time is set to between midnight and 1 am every day. This is fine.
There is one more option. This option is a notification. The trigger will send me an email confirmation. Leave this notification option alone. Click the Save button.
The trigger portal is updated with the trigger we created.

We have two functions to run in our sheet. We need another trigger to run the Fahrenheit conversion function. Click the Add trigger button. Select the fahrenheitConvert function.
Set the trigger to be time-driven. Set the trigger to run on a daily basis. Click the save button.
The trigger’s page updates with our second trigger.

The triggers are set and we don’t have to worry about running the functions manually.
Modified functions and trigger
We have two triggers running on the same spreadsheet. These triggers are set to run on the same days and time. This is not the most efficient way to do this. Ideally, we should have one trigger for both functions if they are going to take place on the same date and time.
Return to the code editor. Click after the last line and press the Return key twice.
We are going to create a function that runs the other functions. This is one of the purposes of functions. Type function updateFormulas(){ and press the Return key twice. Place a closing curly bracket on the second return.

Type this between the curly brackets. Type splitDate(); and press the Return key. Type fahrenheitConvert();. Click the save button.

Return to the triggers tab. We don't need both triggers now. Hover over the first trigger. There is an action menu on the right. Click the menu and select Delete trigger.

Click the Delete Forever confirmation.
Hover the mouse over the remaining trigger. Click the pencil icon to edit the trigger.

Click the function selector. Choose the updateFormulas function. Leave everything else the same and save the changes.
Cancel the edit and refresh the triggers page if you don’t see the function appear in the list.
We have one trigger that runs both functions.

That ends our exploration of Google Apps scripts and Triggers. The next lesson jumps into the charts and gauges for our data.