Weather Station Project: Lesson 2

Introduction
This is the second lesson in our weather station project. These are the steps covered in the lesson. Each step is covered using Mac, Windows, and Chromebook.
Download the Raspbian operating system (lite version)
Flash the image onto the MicroSD card
Create an SSH file to access the Raspberry Pi remotely
Create a Wifi configuration file to connect with your Wifi
Insert the MicroSD card into the Raspberry Pi
Download Raspian OS
The Raspberry Pi uses an operating system based in Linux. Linux is a free and Open Source operating system. Linux, in one form or another, is responsible for the Internet. Most web pages are hosted on Linux. Linux is found in many devices from home thermostats to smartphones. The Linux for the Raspberry Pi is called Raspian. It is built specifically to run on the Raspberry Pi. It is not the only version but it is the one we will be using.
The Raspian operating system was installed on the micro SD card we just erased. Why did we erase the card then? I want you to understand the process of getting a Raspberry Pi up and running from scratch. This process will help you prepare a Raspberry Pi anytime. The download process is the same for Windows or Mac.
The operating system is available from the Raspberry Pi website. Go to “https://raspberrypi.org/downloads”. Click the Raspbian button.

There are three download options. The first two are typical download options. These versions contain many resources. These resources are very good if we plan to use the Raspberry Pi as a desktop device. We don't need all these resources for our projects. The full version is over two gigabytes. The desktop version is a little over one gigabyte. We will use the lite version. This is just a little over four-hundred megabytes. The small size is faster to download and install on the Pi. We will install and update the resources we need.

Click the Download zip option.
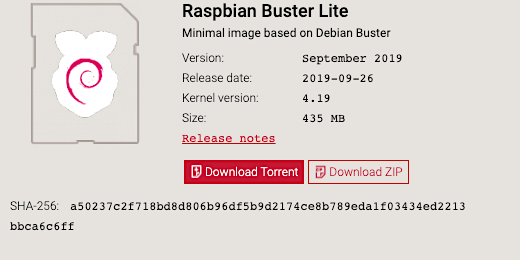
Wait for the Raspbian file to download. Find the file on your computer. Double click the file to extract the operating system image. Place the image file on your desktop. The Raspbian image file will have a name that begins with a date. The date is followed by raspbian-buster.img. The date of my image is September 26, 2019. The date on your image file might be different. 2019-09-26-raspbian-buster.img. The image file ends with the “.img” extension.
Flashing the micro SD card (Mac and windows)
We need a special program to help us place the image onto the micro SD card. We can’t just copy the file over. The process of flashing a micro SD card with the image is important. The Raspberry Pi will not be able to boot from the card if it is not properly formatted and flashed. The flashing tool is available from Balena. Go to https://balena.io/etcher.
The process to flash the MicroSD card with Balena Etcher is the same for Mac and Windows. I have instructions for doing this with a Chromebook in the next lesson.
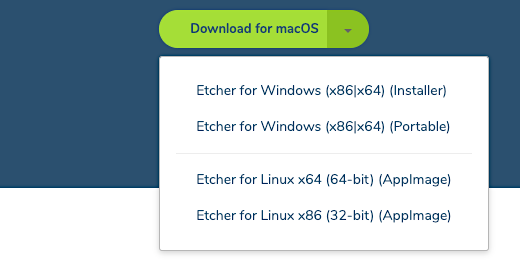
The site recognizes the operating system of your computer. The download button will point to the version of Balenaetcher for your computer. I will download the Mac version. Click the triangle on the button to select another download option. On Windows, I recommend using the Etcher for Windows Installer option.
Download and install the Balenaetcher app on your computer. Mac users will copy the file to the Applications folder. Windows users will run the installer. Open the application after the installation is complete.
There are three steps in the process. We need to select the Raspbian image first. We then select the micro SD card for the destination. In the third step, we begin the process of etching the operating system. Click the "Select image" button.

Navigate to your computer’s desktop and select the image file. The file will appear as the selected image. Click the Select Target button.

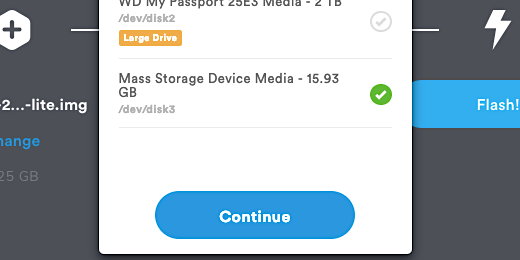
Find the micro SD card and select it. The disk identifier might change if you connect another drive to the computer. Verify the device by checking the storage capacity. Click the continue button.
Verify the image file and the destination drive one last time. Click the Flash button. You will be prompted on Mac to enter your Admin password to authorize the flash process. Windows will ask you to confirm that you want Belenaetecher to modify the drive.

The Flash process takes several minutes. Don’t interrupt the process. The image will be Flashed onto the drive and verified. The verification process assures there were no errors during the process.

If there are errors here are some things to do. Reformat the micro SD card. Download the Raspbian image again and use the new download. Run Balenaetcher again and use the new image file. Delete the older image file. If you still get errors then you may need to use a different MicroSD card.
At the end of the process, you will be informed the Flashing is complete. You will be prompted to Flash another. We don't need to Flash another. Quit the Etcher application. The Etcher application ejects the drive at the end of the process. Unplug the adapter and then plug it back in. The microSD card should appear on your list of devices. On Mac, it will appear on the desktop. On Windows, it will appear in the File Explorer. Look for the drive titled BOOT.
Chromebook
We used the Chromebook Recovery Tool when formatting the MicroSD card. This same tool will flash the Rasbpian OS onto the MicroSD card. Insert the card in one of the USB ports on the Chromebook. Open the Chromebook Recovery tool. Click the gear icon. Select the option to use a local image.

Go to the download folder. Select the Raspbian image. Click the open button.

In step two, you are prompted to select the external drive. Click the selector. Select the MicroSD card. Click the continue button. Click the Create Now button.

The process takes several minutes. At the end of the process, you are prompted to finish or to create another. Go ahead and quit. Leave the drive connected to the computer for the next step.
The SSH file
We are not going to connect a keyboard, mouse, or display to the Pi. This provides an added level of flexibility. We don't need to dedicate a display to a device that doesn't need one to monitor the weather.
Without a display, keyboard, or mouse we need a way to communicate with the Raspberry Pi. We will use a protocol called Secure Shell, SSH. This is how network servers are managed. The SSH protocol is not automatically available when the Raspberry Pi boots for the first time. We need to include one piece of information so it is enabled the first time the Raspberry Pi boots. This file must be on the card before the Raspberry Pi boots with it for the first time.
By the way, running the Pi without a display, keyboard, or mouse is described as running in Headless Mode.
Enable SSH using Mac
Open the terminal application. Type cd /Volumes and press the return key. This takes us to the Volumes directory. The MicroSD, like other drives, is seen as a volume.

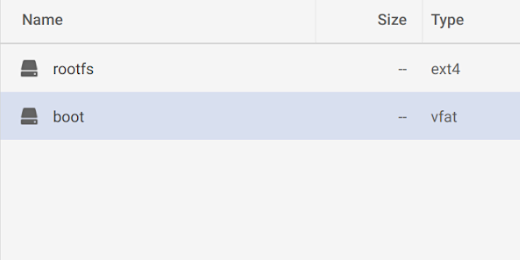
Type ls and press the Return key. A list of the mounted volumes will display. Look for the boot volume.

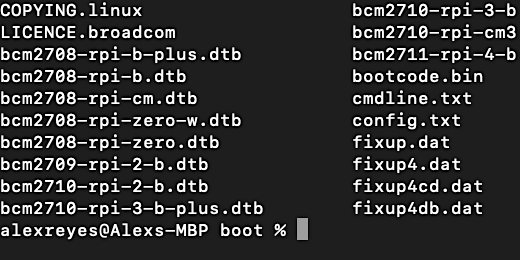
Type cd boot and press the Return key. This places us inside the MicroSD card.

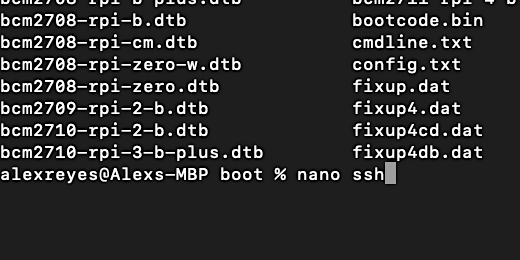
Type "ls" and the Return key to see a list of the files on the card. We are going to add one more file.
Type nano ssh and press the Return key. We are using a simple command-line word processor called nano. We have instructed the computer to use nano to create a file called ssh. The editor opens to begin editing the file.
We are not going to place anything in this file. Don't change anything in the file. Don't even press the space bar or return key. We need to create a blank file for Raspbian to enable the ssh protocol on the first boot and setup.

There are commands at the bottom of the nano application. Press the Control key and the letter "o" at the same time. This will save the file to the microSD card. The little arrow next to the letter is called a carrot and it represents the Control key.

The ssh file name appears for us to confirm we want to write the changes to the file. Press the Return key. The changes are updated and saved to the drive.

A message appears informing us we saved a file with "0 lines" of information. If you have any number other than zero please remove any spaces or hard returns. Press Control and "o" to save the updated file.

Press the Control key and the letter X to exit the nano editor. We are going to create another file. This file enables and configures the WiFi. This is an important step so we can work on the Pi in headless mode. Go over to the connecting to the Wifi lesson.
Enable SSH using Windows
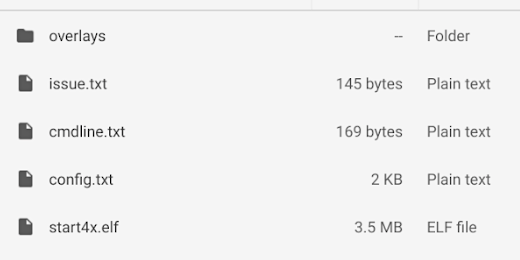
Open the File Explorer and look for the MicroSD card. The card is named boot. The files and folders in the drive are part of the Raspbian OS.

Right-click anywhere inside the drive where you see the files. Select the option to create a new text document.

A plain text document is created. The file name is selected so we can replace it with our own.

Type ssh and press the Return key. The file does not need an extension.
SSH on Chromebook
We need to create a plain text file. Google Docs create and export plain text files. I prefer to use a specialized text editor for code. The editor is available from the Chrome Web Store. Open the Chrome Web store. Search for "text editor". We are going to use a very simple text editor. The editor is an extension. Click the "Add to Chrome" button. Authenticate the installation.

Look for the extension on your browser. Click on the extension.

The editor opens with a newly created document. Don't type anything into this document. Click the "Save as" button.

Click on the MicroSD card drive. It is labeled as External Drive.

Double click the boot partition.
The boot partition contains the system files for Raspbian. Don't delete, open, or modify any of the files.
The editor creates a random name for the file. Erase the name and type ssh. Don't include the quotation marks.

Make sure to erase the ".js" extension.

Click the Save button when the ssh file is properly renamed. We don't need this file open. Click the "x" to close the document. Leave the editor open for the next step.
Connecting to the WiFi
The first two versions of Raspberry Pi did not come with built-in wireless options. Wireless connections for the Internet and Bluetooth became available with version 3 and continue with version 4, which is the most current version at the time of the writing of these lessons.
The built-in wireless connectivity with Raspberry Pi 3 makes it much easier to use for this project. The first and second versions of the Raspberry Pi did not include wireless capability on the board. They need an extra device to connect to a wireless network. The extra device is a wireless adapter. The adapter connects to one of the USB ports.
I tested several wireless adapter options. I found that the Edimax EW-7811Un 150Mbps 11n Wi-Fi USB Adapter works well with my Raspberry Pi. I am using the Raspberry Pi Model B+ version 1.2. The adapter is less than $15 and well worth it for this project. This device is also one of the recommended devices on the Raspberry Pi website.
Connecting to a wireless network is almost a must to be able to place the temperature sensor in a location that will measure the temperatures we want. We want the sensors to be exposed to the outside. There are very few locations that have network drops outside the building. Wireless networks often extend beyond the building for several feet.
To connect with an existing network we need to provide some information on the microSD card during the first boot. This information is provided in a text file. This will be just like what we did with the SSH file. The SSH file didn't include any information.
The configuration file for our WiFi connection will contain information for connecting to a wireless network. We need to include this information so that the wireless is configured and established for us.
Mac WiFi configuration file
Open the Terminal application if it isn't already open. Type cd /Volumes/boot if you are not in the MicroSD card boot volume.

We are going to use nano again to create the file. Type nano wpa_supplicant.conf and press the Return key.

The file contains lots of information and instructions. It is often easier to copy and paste the code into the file. Copy and paste the code below into the nano editor.
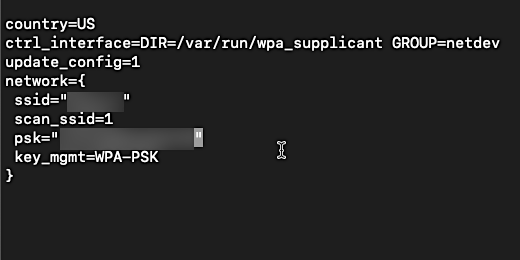
country=US
ctrl_interface=DIR=/var/run/wpa_supplicant GROUP=netdev
update_config=1
network={
ssid="YOURSSID"
scan_ssid=1
psk="YOURPASSWORD"
key_mgmt=WPA-PSK
}
The first line identifies your country. Change the line to match yours. The second line is used to control the wireless adapter through the wpa_supplicant configuration. The third line updates the configuration for the adapter. In the remaining lines, we provide the information for the wireless access network. The SSID or Service Set Identifier is the name of your wireless network.
Here are some basic instructions for navigating inside the nano editor. Use the up arrow on the keyboard to move the white square up. The white square is the cursor. Use the right arrow to move it to the end of the word YOURSSID. Make sure the cursor is highlighting the quotation mark. Use the delete key to erase YOURSSID. Type the name of your wireless network.

Press the down arrow key to go to the psk, passkey, line. Move the cursor to the end of YOURPASSWORD. Make sure the cursor is highlighting the quotation mark. Use the delete key to erase YOURPASSWORD and replace it with the password for your wireless network.
The password is case sensitive. Type it exactly or it will fail to connect. A failed connection means we need to manually configure the wifi. To do this we need to connect a display and keyboard to the P. It's messy. Please be careful.
Once the information for your network is entered we need to save the file to the microSD card. Press the Control key plus the letter "o". This will save the information to the file. We are prompted to confirm the name of the file. Press the Return key to continue.

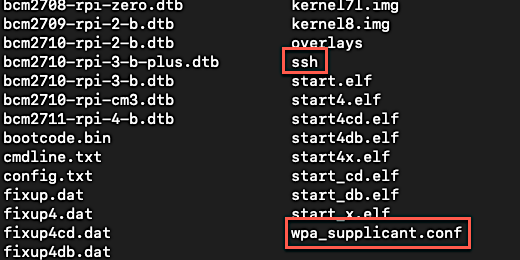
Nano will confirm the saving of the file to the microSD card. Press Control plus the letter "x" to quit the nano editor. Type "ls" at the command prompt. Look for the SSH and wpa_supplicant.conf files we created.
Quit the terminal. Eject the microSD card. Place it to the side for the next lesson.
Windows WiFi configuration
Select the microSD card if it isn't already selected. We are going to create a text file like the one we created for SSH. Right-click in the boot drive and create a new text document.

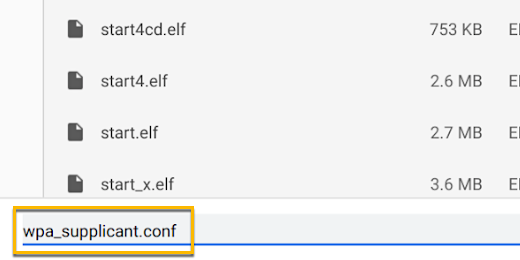
Name the document "wpa_supplicant.conf". Press the Return key to save the new document name.

Open the file with Notepad. You might have to right-click and select open with Notepad.

We need to insert instructions in the document that will be run when the Raspberry Pi starts. Copy and paste the instructions below.
country=US
ctrl_interface=DIR=/var/run/wpa_supplicant GROUP=netdev
update_config=1
network={
ssid="YOURSSID"
scan_ssid=1
psk="YOURPASSWORD"
key_mgmt=WPA-PSK
}
The first line identifies your country. Change this line to match yours. The second line is used to control the wireless adapter through the wpa_supplicant configuration. The third line updates the configuration. In the remaining lines, we provide the information for the wireless access network. The SSID or Service Set Identifier is the name of your wireless network.
Replace YOURSSID with the name of the wireless network you want to access. Make sure to leave the quotation marks.
Replace "YOURPASSWORD" with the password for the wireless network. Make sure to leave the quotation marks.
The password is case sensitive. Type it exactly or it will fail to connect. A failed connection means we need to manually configure the wifi. To do this we need to connect a display and keyboard to the P. It's messy. Please be careful.
Save the changes to the document and quit Notepad.

Both files need to be in the boot drive. They will be used by Raspbian to configure SSH and connect to the wireless network.
Chromebook configuration
The configuration steps on a Chromebook are the same as those used in Mac and Windows. We are just using a different text editor. Use the text editor extension we installed in the SSH lesson. It should still be open from that lesson. Copy and paste this code into the editor. If you can't copy and paste then make sure you type it correctly.
country=US
ctrl_interface=DIR=/var/run/wpa_supplicant GROUP=netdev
update_config=1
network={
ssid="YOURSSID"
scan_ssid=1
psk="YOURPASSWORD"
key_mgmt=WPA-PSK
}
The first line identifies your country. Change the line to match yours. The second line is used to control the wireless adapter through the wpa_supplicant configuration. The third line updates the configuration for the adapter. In the remaining lines, we provide the information for the wireless access network. The SSID or Service Set Identifier is the name of your wireless network.
Replace YOURSSID with the name of the wireless network you want to access. Make sure to leave the quotation marks.
Replace "YOURPASSWORD" with the password for the wireless network. Make sure to leave the quotation marks.
The password is case sensitive. Type it exactly or it will fail to connect. A failed connection means we need to manually configure the wifi. To do this we need to connect a display and keyboard to the P. It's messy. Please be careful.
Click save as.

Change the name of the file to "wpa_supplicant.conf".
Select the external drive disclosure triangle. This reveals the volumes. Select the boot volume.

Click the save button in the text editor. Close the text editor. Eject the MicroSD card.
Assembling the Raspberry Pi
Before assembling the Raspberry Pi I like to insert the MicroSD card. It is much easier to insert the card when the Pi isn't surrounded by the case. Insert the MicroSD card into the slot on the Raspberry Pi. There is a mechanism inside that holds onto the card. I describe it like a pen that clicks. Push the card into the slot until you feel a slight click. You might need to use your fingernail.

There isn't much to assemble. The kit you ordered should have included a box for the Pi. Most Pi boxes come in three parts. The Pi itself goes onto the base. Place the Pi on the base for now. This will keep the electronic components from coming into contact with anything that might damage them. This is a good time to use the Static Strap if you purchased one.

The base and the Pi are enclosed in a protective case. The third piece is a cover. Don't place the cover on the Pi yet. We need to access the GPIO pins in a future lesson.