Micro:bit timer and stopwatch

Timer and stopwatch
Every computer and microcontroller has a built-in clock. This clock is important because it is used to synchronize operations and data transmission. Computers have a built-in rechargeable battery that keeps a clock going when the computer is not powered. This clock is used to keep track of the date and regular time according you your timezone.
Each computer also has an internal timer that begins when the computer starts. The Micro:bit has an internal timer that begins when it is powered or restarted. The timer keeps track of events and coordinates the synchronization of operations and data transfer.
This lesson will use the internal timer to create a basic stopwatch program. The program in this lesson is based on the code provided by Micro:bit to learn the fundamentals. I’ve taken it and expanded on the explanations. The link to the Make Code micro:bit lesson is available below.
https://makecode.microbit.org/projects/stopwatch
Project previews
Use the links below to get a preview of the final project.
StopWatch Make Code:
https://makecode.microbit.org/_PuY8zVbzuXDd
StopWatch Github:
https://github.com/digitalmaestro/stopwatch
Stopwatch
Use the link below to access the Micro:bit development environment. You don’t need an account to begin creating projects for Micro:bit.
Click the Create new project button.

Use “stopWatch” for the project name; click the Create button.

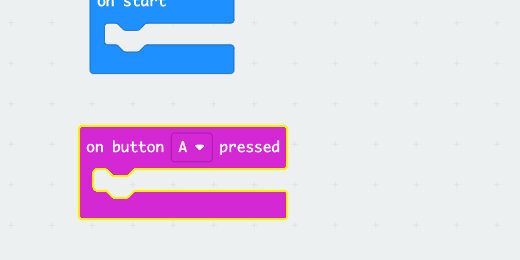
Every new project includes two code blocks on the coding workspace. These blocks include the [on start] section and [forever] loop.

The [on start] section is used to run code as soon as the Micro:bit starts or is restarted. This is where we usually define variables. We will use plenty of variables in our project.
The [forever] loop runs code for as long as the Micro:bit is powered. Code inside this loop does not require any user interaction. We won’t be using the [forever] loop in this project.
Get the [forever] code block and drag it to the Codes Section. Release the code block when a Trash Can icon appears.

Go to the input section; find the [on button A pressed] code block.

Place a copy of the code block on the workspace.
The internal timer begins the moment the Micro:bit starts. There is no way to reset the timer once the Micro:bit has started. We need to capture a moment from the internal timer and save it for use later. That moment will be saved in a variable.
Go to the Variables section; click the ‘Make a Variable’ button.

Use ‘Start’ for the variable name; click the OK button.

Three blocks are created for each variable. The first block is the variable itself. The Set block is used to assign values to the variable. The values can be numbers, letters, or operations. The Change code block is used to change variables with numbers with some regular amount.

Place the [set Start to] code block into the [on button A pressed] function.

Select the Input code category and click the more option.
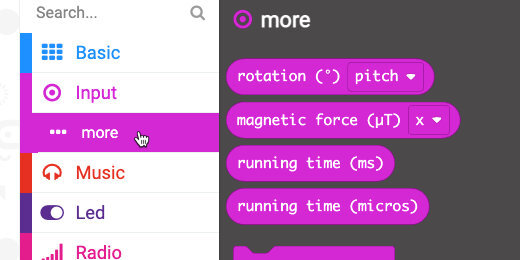
There are two runtime code options. One records time in milliseconds(ms), and the other in microseconds(micros). There are one-thousand milliseconds in one second. There are one million microseconds in one second.
We are going to use the millisecond option.

Place the [running time (ms)] code into the set variable parameter.

Let’s get an idea of what this timestamp in the [Start] variable looks like. Go to the Basic code category; find the [show number] code block.

Place the code block into the [on button A pressed] function and below the set variable code.

Go to the Variables section; get the [Start] code. Place the code into the [show number] parameter.

Go over to the simulator and click on button A.

A number will scroll across the display. This is the elapsed time since the virtual Micro:bit started.

Click button A again; the number will be larger because more time has elapsed.

The variable has captured this moment in time from the Micro:bit. With this time saved, we will subtract a future time to give us the elapsed time.
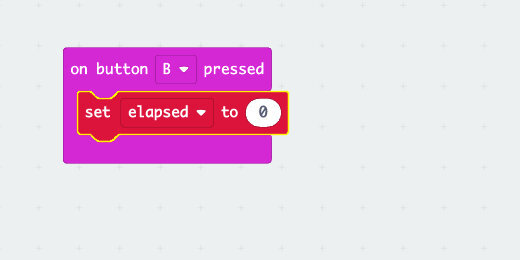
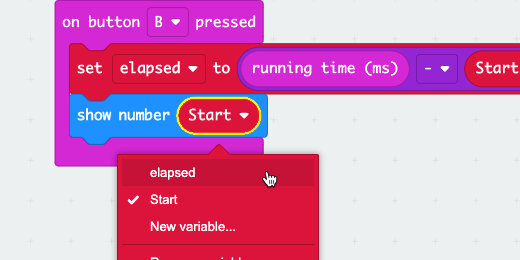
We need another variable to save the elapsed time. Go to the Variables section; click the ‘Make a Variable’ button. Use ‘elapsed’ for the variable name.

The elapsed time will be calculated and saved when we press another button. Go to the Input section. Get the [on button A pressed] code block. Place it onto the workspace.
The second [on button A pressed] code block is green with hash marks. The code is inactive because we cannot have two code blocks that refer to the same button at once.

Click the button selector; choose button B.

Go to the Variables category; get the set elapsed code block. Place the code block into the [on button B pressed] function.
We need to subtract the current run time from the one recorded and saved in the Start variable. Go to the Math code category; find the Subtraction operation.

Place the code block into the Set Variable parameter for the button B function.

Go to the Input category and the more section. Get the [running time (ms)] code block. Place it into the left side of the subtraction operation.

Go to the Variables section. Get the [Start] variable; place it into the right side of the subtraction operation.

Go to the [on button A pressed] function. Right-click on the [show number] code block; select the duplicate option.
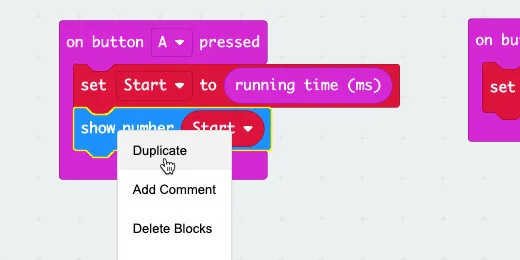
Get the duplicate code and place it into the [on button B pressed] code; place it after the set variable code.

Click the variable selector; choose the [elapsed] variable.
Elapsed time in milliseconds
Click button A in the simulator. A long string of numbers will scroll across the display. This is the time in milliseconds. Reading the time in milliseconds is not human-friendly. Let's get the Micro:bit to display the times in seconds.
Elapsed time in seconds
One-thousand milliseconds is one second. We need to divide the total milliseconds by 1000.
Go to the Math code category. Get a copy of the Division operation and place it on the workspace below the [on button A pressed] function. Don’t put it into the function yet.

Get the [Start] variable from the [show number] code; place it into the left side of the division operation.

Place the division operation into the [show number] code parameter.

Type 1000 into the right side of the division operation.

Repeat the process for the button B code.

Click button A in the simulator. Wait a second or two and click button B. The values scrolling across the display will begin with a whole number followed by a number rounded to two decimal places.
Press button A to get the latest running time. Press button B to get the updated running time and subtract it from the first. This is your basic stopwatch.
If you press button B again—without pressing button A first—you will see a longer elapsed time. This is like a stopwatch lapse function.
Click the Actions menu and select Download to Micro:bit.
