Micro:bit thermometer / thermostat

Micro:bit thermometer / thermostat
The Micro:bit has a sensor to measure the ambient temperature. It is not designed to be touching something like water. The sensor is inside the CPU.
The sensor is like a thermometer. A thermometer, like the one on the Micro:bit, can be used to trigger events. An event can include the update of information on a display or the activating of something like a cooler or heater.
When a thermometer is used to trigger events it is called a thermostat. Thermostats are usually used to regulate temperature. A thermostat does not have to be used to regulate temperature. It can be used for any number of actions in response to a temperature reading. For example, it could sound an alarm if the temperature is too low or high.
In the lesson, we are going to
1. Create code to display the ambient temperature in Celsius.
2. Update the code to display either Celsius or Fahrenheit.
3. Display a friendly icon when the temperature is in a comfort zone.
4. Display a sad icon when the temperature is in an uncomfortable zone
Project preview
A link to the completed project is available below. Use it to get a preview of the final product. The code is also available through my Github repository. Use the link to import the project.
Thermometer / Thermostat project from Make Code
Thermometer / Thermostat project from Github
Celsius and Fahrenheit
Two measurements are commonly used in everyday temperature measurements. Both use the freezing and boiling of water. Celsius uses 0 for the temperature at which water freezes. The boiling point of water is 100-degrees celsius. Fahrenheit uses 32 degrees for the freezing point of water and 212-degrees for the boiling point of water.
Fahrenheit uses zero-degrees to mark the point where an equal mixture of ice, water, and salt freezes. Salt in ice water causes the ice to release energy and make the water colder. This is how ice cream makers get super cold turn cream into ice cream.
The measurement interval between Fahrenheit and Celsius is different. The interval between the scales is five-ninths(5/9). This number is important when we are looking to convert one unit of measure to another. We will revisit this later.
The Micro:bit uses Celsius as the unit of measure for temperature.
Micro:bit simulator
You don’t need to have a Micro:bit to learn about the Micro:bit. Microsoft provides a free online Micro:bit simulator. No login account is required. Use the link below to access the simulator.
The simulator is also the environment we use to create code for the Micro:bit.
Create the project
Click the New Project button.

Set the name of the project to “Thermometer Thermostat”; click the Create button.

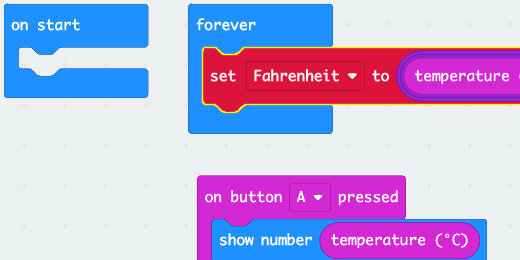
Each new project includes two code blocks. The [on start] code runs instructions the moment the Micro:bit powers up or is restarted. The [forever] loop runs code in the loop for as long as the Micro:bit is powered.

Sensor reading
We are going to display the reading from the temperature sensor.
Select the Basic code section; look for the [show number] code block.

Place the code block inside the [forever] loop.

Select the Input section.

Find the [temperature] code block.

Place the code block inside the [show number] parameter.

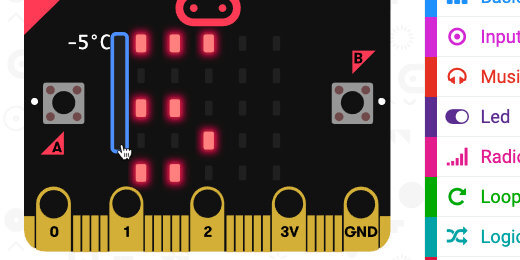
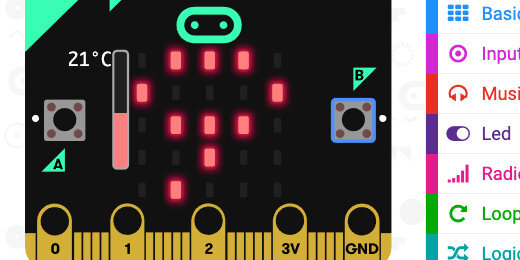
The simulator is not connected to a real sensor to take temperature measurements. The simulator provides a temperature slider to simulate the temperature received by the sensor. The temperature slider is set at the midpoint of 21-degrees Celsius.

Click and drag the slider to the top. The maximum temperature scale is 50-degrees Celsius.

Move the slider down. The lowest temperature registered by the sensor is -5-degrees Celsius.
Fahrenheit
You probably want to know what the temperature readings are in Fahrenheit. We need to convert Celsius to Fahrenheit.
We aren’t just going to convert the temperature and forget about Celsius. We are going to use the Micro:bit buttons to provide the temperature information in Celsius or Fahrenheit.
Select the Input code section; get the [on button A pressed] code block.

Place the code block on the coding canvas.

Get the [show number] code from the [forever] loop and place it in the [on button A pressed] function.
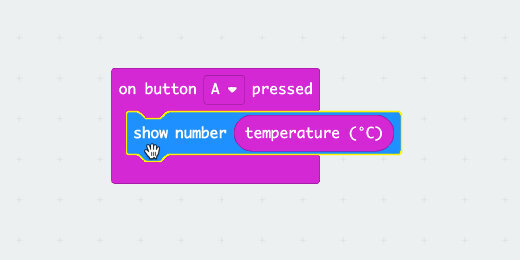
Press the A-button on the simulator. The temperature is sensed and displayed when the button is pressed.

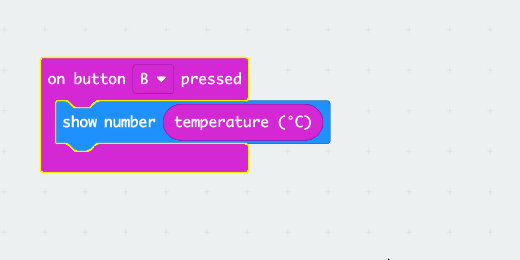
We are going to do the same thing for button B. Right-click the [on button A pressed] code and select the duplicate option.

A copy of the code blocks is created and placed on the canvas. The code is a light green with hash marks. This indicates that the code is not active. Make Code does not permit two functions to be on the canvas for the same button.

Click the button selector; choose B.

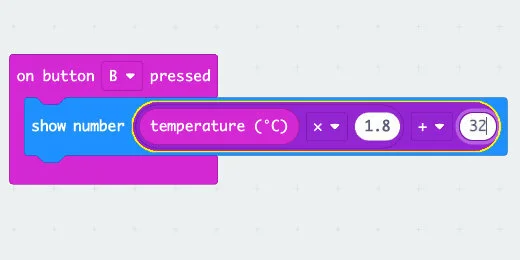
When button B is pressed, the Micro:bit will convert Celsius to Fahrenheit.
Remove the [celsius] input from the [show number] parameter. Set it to one side.

The difference in units of measure between Fahrenheit and Celsius is 5/9. The difference for the freezing point of water is 32. To convert Fahrenheit to Celsius we subtract 32. We then multiply that answer by 5/9. The formula is shown below.
Celsius = (Fahrenheit - 32) x 5/9
To convert Celsius to Fahrenheit we multiply 9/5, the inverse of 5/9, and add 32. We can use the conversation formula with a fraction, 9/5, or with a decimal. The fraction 9/5 is 1.8. The formula is shown below.
Fahrenheit = (Celsius x 9/5) + 32
Go to the Math code section. Find the multiplication operation.
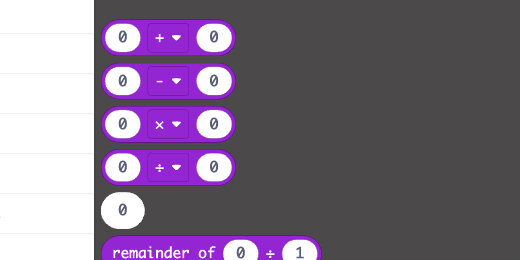
Place the operation code block inside the [show number] parameter.

Place the [temperature] code block into the left side of the multiplication operation parameter.

Enter 1.8 into the right side.

Return to the Math section and get the Addition operation. Place it on the canvas below the code we are working on. We are placing the code here for a moment so we can insert the multiplication operation into the left side of the addition operation.

Select the Multiplication operation and place it on the left side of the Addition operation. Make sure to select the operation block.

Select the math operation block and place it inside the [show number] parameter.

Enter 32 into the right side of the Addition operation.
Go to the simulator and press the B-button. The slider shows the temperature in Celsius. The number scrolling across the display is the same temperature in Fahrenheit.
Move the temperature slider up and down. The maximum temperature in Fahrenheit is 122-degrees. The lowest temperature is 23-degrees.
Comfort zone
We are building on the same project to display a room temperature comfort meter. The Micro:bit will monitor the ambient temperature and report the comfort level. It will report this with icons and occasional information.
The comfortable temperature for most people ranges between 18 and 24-degrees Celsius, 64 and 75-degrees Fahrenheit. Temperatures above and below this range are uncomfortable. The thermostat will display a smiling icon when the temperature is within the range. It will display a Sad icon when it’s too cold and an Angry icon when it’s too hot.
Variables
We have an equation that converts Celsius to Fahrenheit. We need to use this conversion in at least one more location. This is reason enough to use variables.
Variables allow us to store values or the result of complex operations into a container. This container is used where needed without the need to enter the value or recreate the operation. They reduce the chances that we will make mistakes and increase the efficiency of programming.
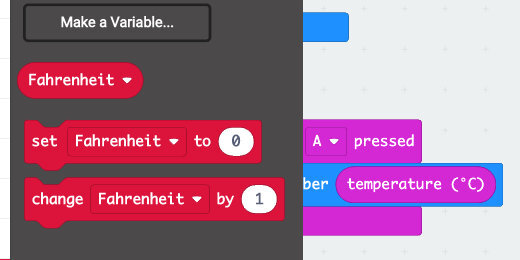
Go to the Variables section; click the Make a Variable button.

Use “Fahrenheit” for the variable name; click the OK button.

Every variable gets three code blocks. Get the [set Fahrenheit to] code block and place it on the canvas.
Get the conversation formula and place it into the [set variable] parameter.

Place the Set code block into the [on button B pressed] function; place it before the [show number] code.

Return to the Variables section and get the Fahrenheit variable block.

Place the variable into the [show number] parameter.

Right-click on the Set Variable code block; select duplicate.

Place the code inside the [forever] loop.
We need a variable for Celsius. We don’t need to convert to Celsius, but it is a good idea to keep things consistent and use variables when we might need to use a value more than once.
1. Return to the Variables section.
2. Create a new variable and use Celsius for the variable name.
3. Place the [set Celsius to] code block on the coding canvas.
4. Place the Celsius code into the variable parameter.
5. (You can either duplicate the code block or get one from the Input section)
6. Place the code into the [on button A pressed] function; above the [show number] code.

Move the button code blocks down and out of the way. We won’t be working on them until later.
Fahrenheit or Celsius
The choice to use Celsius or Fahrenheit is yours. I will use Fahrenheit. The same code works regardless of your choice.
We want to display a smiling icon if the ambient temperature is within the comfortable range, 64 to 75. To do this, we need a condition statement. A condition statement evaluates if something is True or False. The condition statement then performs an action based on the evaluation.
Go to the Logic code section. Look for the [if True then] code block.

Place the code block into the [forever] loop and below the Set Variable code.

If the temperature is below 64-degrees Fahrenheit, 18-degrees Celsius, we want to display a sad face icon. We need to compare the sensor reading to this value. To do that we need a comparator operator.
Go to the Logic section; find the Less Than comparator.

Place the comparator into the condition statement parameter.

Go to the Variables section. Get the variable for your measurement and place it on the left side of the comparator parameter.

Enter 64 into the right side of the parameter; enter 18 if you are using Celsius.

Go to the Basic section. Get the [show icon] code; place it inside the condition statement.

Change the icon to a sad face.

Right-click on the conditions statement; select duplicate.

Place the condition statement after the first.

Click the comparator selector; choose the Greater Than option.

Replace 64 with 75; use 24 for Celsius.

Change the sad icon to an angry icon.

These are the easy conditions. The one for the comfort zone is a little more involved. The condition statement needs to verify specific conditions are met. The lowest temperature must be greater than or equal to 64. The opposite of the first condition. The condition includes the requirement that the temperature is the SAME or greater. The other part of the condition is that the upper temperature is less than or equal to 75.
Boolean logic
Boolean logic is a form of algebra. It is built around three words known as Boolean Operators. The words are “Or”, “And”, and “Not”.
The “OR” operator requires one condition or the other to be Tue. The conditions in an “OR” can be of any number. It Does not matter which one is True.
The “AND” operator requires that all the conditions be True. It does not matter how many conditions there are; they all have to be True.
The “NOT” operator is used in conditions to exclude a condition. We can exclude one or more conditions.
Comfortable condition
The comfortable range is between 24 and 75-degrees. The temperature must be within this range. It cannot be just greater-than-or-equal-to 24. It must also be less-than-or-equal-to 75. This requires that both conditions be met, so we need to use the “AND” Boolean Operator.
Go to the Logic section and get a new [if True then] code block. Put the code on the canvas and to one side of the [forever] loop.

Return to the Logic section. Look for the “AND” operator in the Boolean section.

Place the operator into the condition statement parameter.

Go back to the Logic section. Get a less-than operator and place it on the left side of the Boolean Operator. Get another less-than operator and place it on the right side.

Change the less-than operator on the left to greater-than-or-equal-to. Chang the operator on the right to less-than-or-equal-to.

Get the condition statement and insert it between the other two conditions. It can go anywhere. I think this brings home the visual that the comfort level is between the cold and hot extremes.

Get a [show icon] code block and place it inside the condition statement. Use a Happy face for the icon.

Get the temperature variable and place it into the left side of the greater-than-or-equal-to comparator.

Get another temperature variable. Place it on the left side of the other comparator.

Enter 64 for the left comparator and 75 for the right comparator.

Test the code
Look at the simulator. The Happy icon is displaying. Move the temperature slider up and down to watch the icons update.

Move the slider and press the A or B button to display the temperature in either Celsius or Fahrenheit.
Display temperature
It would be nice to periodically display the temperature without having to press one of the buttons.
Go to the Basic section; find the [pause] code. It is near the bottom.

Place the code after the last condition.

Click the interval selector; choose 5-seconds.

Place the [show number] code block after the [pause]. Place the temperature variable into the parameter.

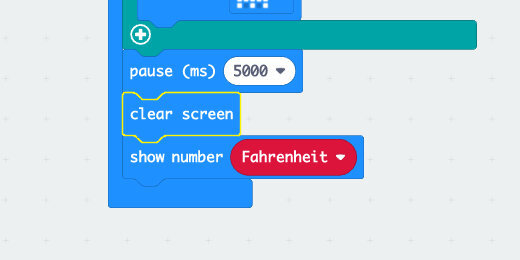
Clear the display
Everything is working nicely. The icon is followed by the temperature after a 5-second delay. The temperature information displays right next to the icon. This can make it difficult to read.
Go to the Basic section; find the [clear screen] code block. Place the code after the [pause].
Conclusion
We have a thermometer that displays the temperature in Celsius or Fahrenheit with the press of a button. The thermometer causes an event to happen while constantly sensing the ambient temperature. We get different icons for different ranges of temperatures. We have a basic thermostat.