Micro:bit light meter for projects

Micro:bit light meter
In this lesson, we are using the Micro:bit light sensor to record the light values of different sources. This makes for a nice science project.
The project
The goal of the project is to create a light meter to register light values from two different sources at a time. The meter allows us to quantify the brightness of a source. These sources can include a candle, flashlight, LED, incandescent bulb, and fluorescent lights.
Sources are not limited to objects. Sources can include locations like a classroom, the outside, a library, or a cafeteria.
I have provided Google Documents with tables of several objects and location ideas. Use the link below to get a copy of the Google Docs. Each document includes instructions.
Light meter comparison table for objects
Light meter comparison table for locations
Light meter comparison table for compare and contrast
You don't need to collect data with tables. The project will allow you to collect two separate light value readings and compare the different values with the Micro:bit.
Get the completed project using one of the links below.
Light meter project (Made Code)
Light meter project (Github)
Code outline
In the code, we are going to…
1. Activate the simulator light sensor.
2. Create code to store the value for one light measurement.
3. Create code to store the value for separate light measurements.
4. Create code to compare the two values.
Micro:bit simulator
You don’t need to have a Micro:bit to learn about the Micro:bit. Microsoft provides a free online Micro:bit simulator. No login account is required. Use the link below to access the simulator.
The simulator is also the environment we use to create code for the Micro:bit.
Create the project
Click the New Project button.

Set the name of the project to “Light meter”; click the Create button.

Each new project includes two code blocks. The [on start] code runs instructions the moment the Micro:bit powers up or is restarted. The [forever] loop runs code in the loop for as long as the Micro:bit is powered.
Simulated light
The simulator in Make Code cannot register the light through a sensor. It does; however, have a way to simulate the light received by the sensor. We will activate the simulated sensor to test the code during development. In the end, we will remove the code before downloading it to your Micro:bit.
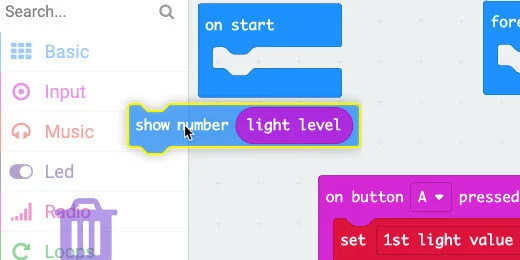
Go to the Basic code blocks section and find the [show number] code block.
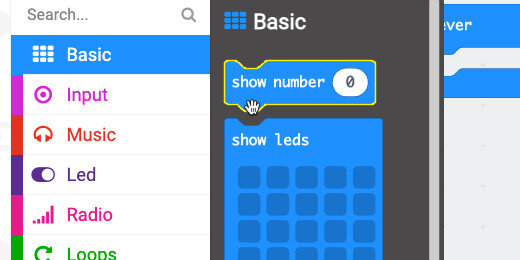
Place the code into the [on start] code block.

Go to the Input section. Find the [light level] code.

Pace the code into the [show number] parameter.

The simulator has a light meter tool in the top left corner.

We are going to store the value of one light reading into a variable. The value will be written to the variable when the A-button is pressed.
The first light value
Go to the Input section and find the [on button A pressed] code.

Place the code block on the canvas.

Go to the Variables section and click the “Make a Variable” button.

Use “1st light value” for the variable name; click the OK button.

We need another variable for the second light value. Make another variable. Use “2nd light value” for the variable name.
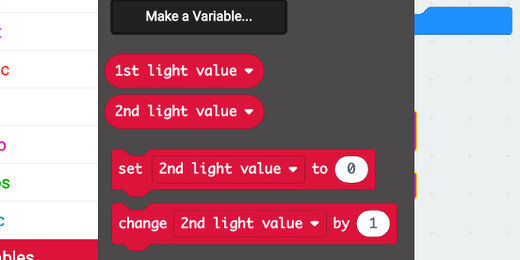
Get the [set variable value to] code block. Place it in the [on button A pressed] code function.

Click the variable selector and choose the “1st light value” variable.

Place the [light level] code, from the Input section, into the variable parameter.
This instruction activates the light sensor and records the reading into the variable “1st light value”.

Right-click on the [show number] code block in the [on start] function; select duplicate.

Place the duplicate code into the [on button A pressed] code block and after the [set variable to light level] code. This provides feedback for the value recorded into the variable.
The Micro:bit does not have a light meter like the simulator. We need a way to display the value recorded by the light sensor.

At this point, this is all we need to collect the light measurement from different objects or locations. You can download this code to the Micro:bit and use it as is. But, we are not done yet.
The second light value
The code to get the second light value is almost identical. We record the data into a separate variable and use a different button to start the process.
Right-click the [on button A pressed] code and select duplicate.

Place the code to one side. The code colors are dimmed in a hashed green. This is Make Code’s way of telling us that the code is not enabled to work. We cannot have two [On Button pressed] code blocks for the same button.

Click the button selector; choose the B-button.

Click the variable selector and choose the “2nd light value” variable.

Comparing measurements
Button A will record and store one light value. Button B will record and store another light value.
In the next part, we are going to write code to compare the values and show the difference.
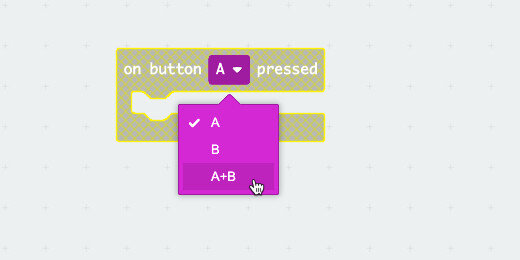
To display the information we need to assign the instructions to a separate button or input option. There isn’t a third button option but there is the option to press both buttons at the same time.
Get the [on button A pressed] code from the Input section and place it on the coding canvas.

Select the A+B option from the button input selector.
Get the [show number] code and place it in the [on button A+B pressed] function.

Go to the Math section; find the Subtraction operation. Place the code into the [show number] parameter.

Go to the Variable section. Place the [1st light value] variable into the left side of the operation. Place the [2nd light value] into the right side of the operation.

This is all we need.
Test the code
Go to the simulator and move the light meter to a value. Press the A button to record the reading. Move the light meter to a different value; press the B button. Press both A and B buttons to display the difference between the values.
One more thing
To make the displayed answer a little more friendly, I think we should have it display the numbers being subtracted in addition to the answer.
Get the [show string] code block from the Basic section. Place the code before the [show number] code.

Click the Advanced section option; find the Text code section.

Find the [join] code block.

Place the [join] code into the [show string] parameter.

Get the [1st light value] variable; place it into the first join parameter.

Replace the word in the second parameter with the minus symbol.

Click the Plus button in the [join] code to add another text parameter.

Place the [2nd light value] variable into the new text parameter.

Add another text parameter and type the Equal symbol into the parameter.

Run the program again. Get a new value for each of the variables and press the A and B buttons. The Micro:bit displays an expression of the light values and difference.
Cleanup
You don’t need the [show number] code in the [on start] function for the real Micro:bit. If you are going to download this to the Micro:bit. Remove the code.