Micro:bit temperature transmitter

Temperature transmitter
This lesson builds on a previous lesson for a temperature sensor. You don’t need to go through that lesson to follow along with this lesson.
In that lesson, we created a thermometer to read the ambient temperature. The thermometer reports the temperature in Celsius or Fahrenheit when the A or B button is pressed.
The thermometer provides continuous feedback on the ambient temperature. It displays a happy face when the temperature is comfortable, an angry face when it's too hot, and a sad face when it is too cold. Use the link below to access that lesson.
This project uses two Micro:bits. One will record the ambient temperature and the other will receive and display the temperature. This allows us to remotely monitor the temperature from one Micro:bit. This is useful if you don't want to constantly pick up the Micro:bit from its location to get a reading.
The purpose of the project is to be able to monitor the temperature of a location from another location. For example, we can place one the sensing Micro:bit outdoors. The other Micro:bit can be inside a classroom. We can monitor the outdoor temperature from inside the classroom.
Here are some other ways we can use this project. The sensing Micro:bit can be placed into a refrigerator, a freezer, in a sealed plastic bag, and hot water.
We can use it in a science experiment with ice water and salt. Get a container, 1 or 2 gallons; add water and ice in equal amounts. Place the Micro:bit thermometer into a water-tight container like a plastic bag. Measure the temperature until it can't get any colder, around 32-degrees Fahrenheit 0-degrees Celsius. Add salt to the ice water and gently stir. The temperature will begin to drop. This combination can bring the temperature down to minus 6-degrees Fahrenheit. Colder than the freezing temperature of the water.
I recommend a good water-tight container for electronics if you plan to place the Micro:bit into the water. I use a water-tight pouch designed for cell phones. It's large enough to accommodate the Micro:bit and battery. There are plenty of sources available through online retailers. Make sure the pouch has an IPX7 or IPX8 rating. IPX7 items can be submerged up to 1 meter for 30 minutes. IPX8 can be submerged deeper than a meter and can be in the water longer.
The thermometer
Use the link below to get a copy of the thermometer program created in the Thermometer / Thermostat lesson.
https://makecode.microbit.org/_CTiWy7U3qPMe
Github https://github.com/digitalmaestro/thermometer-thermostat.git
The thermometer reports the temperature in Celsius when the A button is pressed. It reports the temperature in Fahrenheit when the B button is pressed. In the Forever loop, it is providing constant information on the ambient temperature. It provides feedback in the form of icon expressions.
Transmitting and receiving
The same code works for transmitting and receiving information. To transmit and receive information between Micro:bits, we need to use code in the Radio section. Select the Radio section.

The Micro:bit needs to pair with another Micro:bit to send and receive information. This is done using the [radio set group] code block. Get the code block and add it to the [on start] function.

The radio group is set to one automatically. The group number can be any number from 0 to 255. The important thing to know is that the communicating Micro:bits must be using the same group number. Leave the radio group set to one.
Go back to the Radio code section and find the [radio send number] code block.

Place the code block after the [set Fahrenheit to…] code in the [forever] loop.

I am using Fahrenheit for the example; we can just as easily send Celsius information.
Go to the Variables section; get the Fahrenheit variable and place it into the [radio send number] parameter.

At this point you will notice a second Micro:bit appears in the simulator section. This is all the code we need to begin transmitting and receiving.

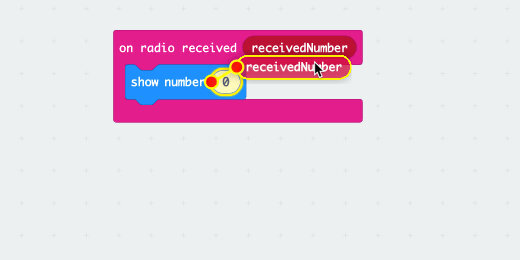
Now we need a way to receive the information. Find the [on radio received(receivedNumber)] code block in the Radio section.

Place the code block on the canvas. The code we place in the function decides what we do with the information received. We will just display the information for now.

Go to the Basic section and get the [show number] code block.

Pace the code block into the [on radio received(receivedNumber)] function.

To show the number from the transmitting Micro:bit, we need to pass the received value into the parameter. The function has a variable to place into the parameter. The variable is called [receivedNumber] and it is in the [on radio received] parameter.

Select the variable from the parameter and place it into the [show number] parameter.
These are all the modifications we need to send and receive data from the thermometer.

Go to the simulator section. Adjust the temperature input slider. Make it hotter by sliding it up.

The first Micro:bit shows the proper icon, angry. The other Micro:bit still shows a happy face. The information is transmitted and received but there is a conflict. The second Micro:bit has a temperature sensor too. The code is getting the readings from that sensor and displaying a happy face.
Receiver only
We built both transmitter and receiver into the same code. I did this so you could see how it works in one example. We are going to modify the code a little to make one Micro:bit into a receiver only. The other will be a transmitter.
The receiver does not need to send information. We don’t need the [radio send number] code.
The code is between other code blocks. Hold the Option key on your keyboard while pulling the code out. The Option key isolates this one block from the others for movement.

Take the code block to the codes section to remove it from the program.

Receiver variable
The receiver is set to record the ambient temperature from the receiver itself. This needs to be changed to display the information received from the transmitter. To do that we need a variable to hold the data from the transmitter. The variable will replace the sensor reading code, [temperature].
Go to the Variables section; click the Make a variable button.

Use “transmittedTemp” for the variable name; click the OK button.

Get the [set transmittedTemp to] variable.

Place the code block into the [on radio received] function.

Remove the [show number] code block.

Place a copy of the [receivedNumber] variable into the [set transmittedTemp] assignment parameter.

The variable will contain the temperature reading sent from the transmitter. We need to replace all the [temperature] code blocks with the [transmittedTemp] variable.
Go to the A Button function. Remove the [temperature] code block from the [set variable to] parameter.
Get the [transmittedTemp] variable from the Variables section; place it in the parameter where we removed the [temperature] code.

Remove the [temperature] code from the [show number] parameter.

Place the [transmittedTemp] variable into the [show number] parameter. Repeat the process for all instances of the [temperature] code.

Don’t forget the one in the [forever] loop.

Receiver only
This Micro:bit is only a receiver now. It does not get information from the temperature sensor. The temperature slider is not on the Micro:bit anymore. If the slider is still there, make sure you replaced all the [temperature] code with the [transmittedTemp] variable.

Rename the project
Go to the project name field and update the name. Use “Thermometer Receiver” for the name.

Transmitter code
We need a separate project for the transmitter. Use the link below to open the Make Code site in a new tab. Create a new project. Use Thermometer transmitter for the project name.
Go to the Radio section. Get the [radio set group] code; place it into the [on start] function.

Get the [radio send number] code; place it into the [forever] loop.

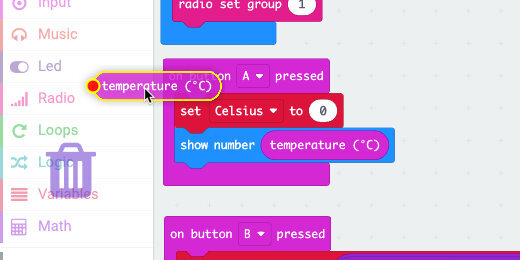
Go to the Input section; find the [temperature] code block.

Place the code into the [radio send number] parameter.
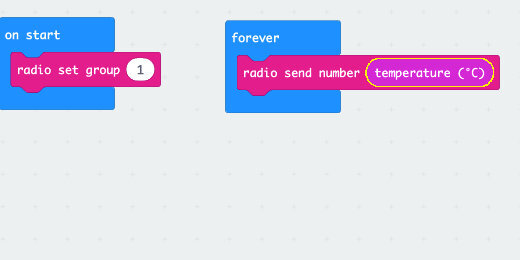
This is all the coding the transmitting Micro:bit needs. The code on the receiver will take care of converting the values to Fahrenheit. The A and B buttons will do their thing.
Too much information
The receiver code includes the comfort zone display. This is not always needed. There is no need to get rid of it. We can make the comfort zone display optional. Using the A+B buttons we will toggle the display code on or off. It will be off when the Micro:bit starts and turned on when buttons A+B are pressed. This will give you the option to get continuous feedback or not.
The code in the forever loop is already lengthy. Whenever we have a block of code that serves a specific function, that is the time we need to place it into a Function.
Click the Advanced option in the code section; select the Functions section.

Click the “Make a Function” button.

A function configuration box opens. Click once inside the function name.

Use “comfortDisplay” for the function name; click the done button.

Move the Function container next to the [forever] loop.

Select the first block in the [forever] loop; move it to the function.

Click the Minimize button.

This collapses the function so the code is neatly tucked away.

Go to the Variables section; click the “Make a variable” button.

Use “toggle” for the variable name; click the OK button.

Get the [set toggle to] code and place it on the canvas.

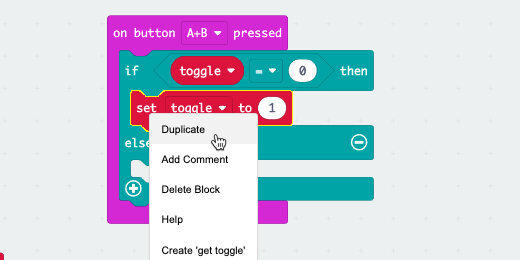
Go to the Logic section; get the [if True then] condition statement. Place it on the canvas.

Place the [set toggle to] code into the condition code.

Go to the Input section; get the [on button A pressed] code and place it on the canvas.

Place the condition statement into the button function.

Click the button selector; select the A+B option.

The condition needs to check the toggle value. If the toggle is zero, then the Micro:bit will NOT display the comfort symbols. This will be the state when the Micro:bit starts.
To evaluate the condition, we need a comparator. Go to the Logic section. Find the Equallity comparator.

Place the comparator into the condition parameter.

Go to the variables section. Get the [toggle] variable; place it into the left side of the comparator.

Change the value of the [set toggle to] variable; use 1 for the value.

Hang in there!
This is what is going on up to this point. When we press the A and B buttons the condition statement will check the value of the toggle. The value is set to zero when the Micro:bit starts. —We will set this in a moment.— If the value is zero then it will change the toggle value to 1. The 1 instructs the code to display the comfort zone information. The number zero is the Off switch and the number 1 is the On switch.
Back to our code
Pressing the A and B buttons will display the comfort icons. Pressing the buttons again will hide them. That’s what a toggle does.
Click the Plus button in the [if True then] condition.

This adds an Else option to the condition.

Go to the Variables section; get a [set toggle to] code block. Place it into the Else section.

This is what the code does. If the toggle value is zero, the value is updated to 1; Else the toggle is set to zero. The Else portion looks to see if the value is anything else other than zero. If it is, then it sets the value to zero.
Let’s say that a different way. If the toggle is off change it to on. If it is not off then turn it off.
The next part of the code uses almost all the same code. We will save some time and duplicate the condition statement. Right-click on the condition statement and select Duplicate.
Place the duplicate code into the [forever] loop.

Remove the [set toggle to] code blocks.

Change the zero in the comparator to one.

Go to the Functions section; look for the call function block.

Place the [call comfortDisplay] code into the If section of the condition.

The condition compares the value of the [toggle] variable to the number. If the value of the toggle is one, then the display code is called to run. If the value of the toggle variable is NOT 1 then the function is not called. The Else part of the condition needs to be here even if we don't provide any code.
Go to the Variables section; get the [set toggle to] code block. Place it into the [on start] function. This sets the start-up value of the toggle variable to zero. The toggle is off and the comfort information will not display.

Run the program
The display on the Micro:bit is blank. None of the information received from the transmitting Micro:bit is displayed.

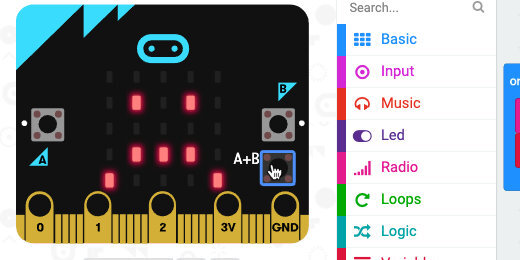
Click the A+B button.
The Micro:bit will display a sad face. The temperature will display a few seconds later.
The simulator is not receiving anything from the transmitter so it can only report a default value. That value is zero degrees Celsius or 32-degrees Fahrenheit.
Press the A+B button to turn off the comfort display.
Press the A button to see the temperature in Celsius. Press the B button to display the temperature in Fahrenheit.
Ready to download
Download and transfer the Thermometer **Receiver** code to one Micro:bit.
Download and transfer the Thermometer **Transmitter** code to another Micro:bit.
Final notes
The transmitting Micro:bit does not display any content. There is no need to display anything since it is most likely to be out of sight. This extends the life of the battery if the sensor is going to be in a location for some time.