Micro:bit remote sensor

Remote sensor and progress bar
The Micro:bit has a variety of sensors built into the device. It can interface with other sensors connected to contacts on the Micro:bit. This makes the Micro:bit a good tool for science investigations and data collection.
One Micro:bit connected to a computer and collecting data is a common way to gather sensor information. Another way is to pair it with another Micro:bit. In this way, one Micro:bit is used to gather data from a remote source and send the data to another Micro:bit connected to a computer. The data is sent through the Micro:bit Radio. The receiving Micro:bit is connected to a computer to collect data and store it for analysis.
The Micro:bit collecting data may usually be in a location that is not easily accessed or where it would be better not to disturb the data collection process. For example, the transmitting Micro:bit could be on the roof collecting temperature, light, or moisture data. The Micro:bit could be in a bucket of ice-water. It could be outside a window gathering temperature and moisture information. It could be in another classroom with one group of students using the Micro:bit to transmit data to another class.
The lesson objectives
This lesson requires two Micro:bit devices. One is used to collect sensor data from a source. The other is used to receive the data and store it onto a computer as a CSV, Comma Separated Value, file.
I want to take this lesson beyond the fundamentals and include other options. One of those options includes a progress bar. The progress bar is used to provide visual feedback on the device when it is working to collect and transmit data.
This lesson demonstrates how we use code within a program to do a lot of tasks for us. Most of those tasks are math-related. This lesson will use math to calculate several variables.
We are creating two programs. One is for the first Micro:bit to collect and transmit data. The other is for another Micro:bit to receive and save the data to a CSV file.
The project can be used to transmit data from any sensor on the Micro:bit. It can also be used to collect data from a sensor connected to the Micro:bit.
Project previews
Use the links below to see and get a copy of the finished projects. Use them as a resource to check your own finished project.
Micro:bit transmitter (Make Code):
https://makecode.microbit.org/_ViH5R3eX26X3
Micro:bit transmitter (Github):
https://github.com/digitalmaestro/microbitSensorTransmitter
Micro:bit receiver (Make Code):
https://makecode.microbit.org/_86P3iJidxf4w
Micro:bit receiver (Github):
https://github.com/digitalmaestro/microbitSensorReceiver
The project
The programs will be developed using Microsoft Make Code. This is a free online IDE, Integrated Development Environment. Use the link below to access the online IDE. You don’t need an account to create projects.
Click the New Project button.

Use “sensorTransmitter” for the project name; click the Create button.

Every new project includes two code blocks on the coding workspace. These blocks include the [on start] section and [forever] loop.
The [on start] section is used to run code as soon as the Micro:bit starts or is restarted. This is where we usually define variables. We will use plenty of variables in our project.
The [forever] loop runs code for as long as the Micro:bit is powered. Code inside this loop does not require any user interaction. We won’t be using the [forever] loop in this project.
Get the [forever] code block and drag it to the Codes Section. Release the code block when a Trash Can icon appears.

To transmit data we need to activate the Radio on the Micro:bit. Click on the Radio section; look for the [radio set group] code block.

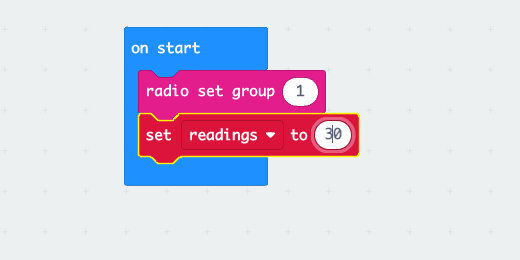
Place the code block into the [on start] section. The Radio set group is automatically set to group 1. We can use any group number from 0 to 255. Group one is a good place to start. The same radio group number must be used on both the transmitting and receiving Micro:bit.

We need to gather data from one of the sensors. We’ll use the temperature sensor for this example. We will create a variable to store the value from the sensor reading.
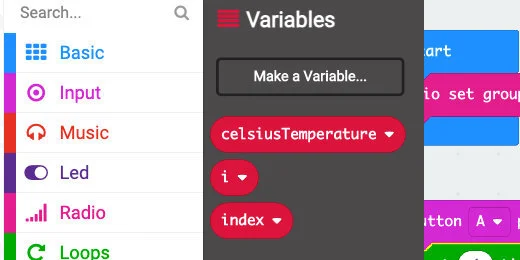
Go to the variables section; click the “make a variable” button.

Use “celsiusTemperature” for the variable name; click the OK button.

Three code blocks are created for each variable. The first is the variable itself. The second is used to set, or assign, a value to the variable. The third is used to change the value of the variable by some numerical increment.

Go to the Input section; find the [on button A pressed] code block.
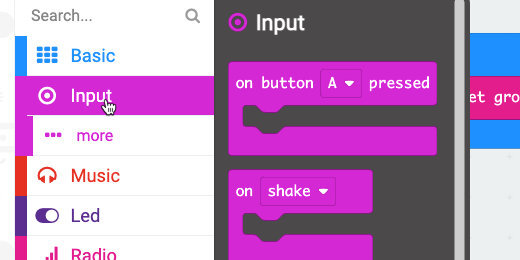
Place the code block on the canvas.

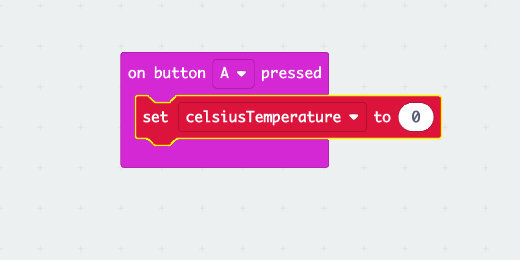
Get the [set celsiusTemperature] variable; place it into the [on button A pressed] code.
Go to the Input code section; find the [temperature] code.

Place the [temperature] code into the [set celsiusTemperature] code parameter.

When we press button A, the code will query the temperature sensor and store the value into the [celsiusTemperature] variable.
After getting the temperature from the sensor, we need to transmit that information to the receiving Micro:bit. Go to the Radio code section; find the [radio send value] code.

Place the code block into the [on button A pressed] code and after the variable code. Code is processed in the order it is created. We need to get the temperature value before sending it to the receiving Micro:bit.

The send value code block has two parameters. The first parameter is used to provide a name to the numeric data in the second parameter. Type “Celsius” into the value name parameter.

Get the [celsiusTemperature] variable from the variables section; place it into the second parameter for the radio send code.

The code will get the temperature data and transmit it to the other Micro:bit each time button A is pressed.
Multiple readings with loops
We want to automate the process so the Micro:bit collects multiple readings from the sensor and transmits each.
Go to the Loop section; find the Repeat loop.

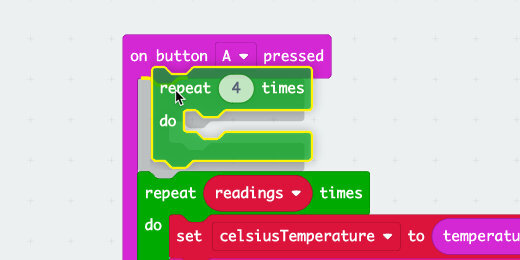
Move the loop over the [on button A pressed] code. Look at the code shadow and make sure the other code blocks pop inside the loop.

The Repeat loop is set to repeat the code in the loop 4 times. Each loop represents a reading from the sensor and a value sent to the receiving Micro:bit.

We are going to need to gather many more data values over some time. We need a variable to store the number of readings we want to collect. Go to the Variables section. Click the "make a variable" button.
Use “readings“ for the variable name; click the OK button.

Get the [set readings to] code; place it into the [on start] section.
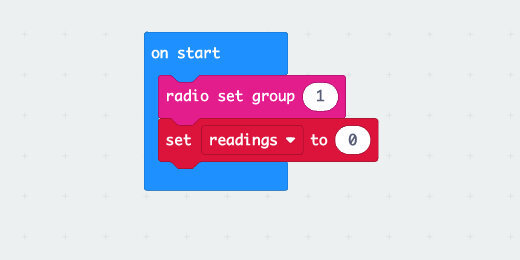
Enter thirty into the assignment parameter for the variable. In this example, we are going to collect thirty readings from the temperature sensor.
Get the [readings] variable; place it into the loop parameter.

The number of values we want is assigned to the readings variable when the Micro:bit starts. That value is passed into the loop and ready for when we press button A.

The Micro:bit is fast and it processes instructions almost instantly. It will process all the sensor readings in less than a second. We need to slow the process to collect readings from the sensor over some time.
Go to the Basic code section; find the [pause] code.

Place the [pause] code at the end of the code in the loop.

The time intervals are measured in milliseconds.
Click the time selector in the [pause] code. We can choose a time interval from 100 milliseconds to five seconds, which is 5000 milliseconds.

We usually don’t think in terms of milliseconds or even seconds for the most part. We think in terms of minutes or hours. To convert minutes to milliseconds we multiply the number of minutes by 60,000. One minute is 60,000 milliseconds. Five minutes is 300,000 milliseconds. Simple enough, but when we have a computer we can have it do all the work.
Minutes to milliseconds
We will add code to convert the number of minutes we want into milliseconds.
Go to the Variables section. Create a variable and use “minutes” for the name. Create another variable and use “pauseTime” for the name.

Get a set variable code block; place it into the [on start] section. The set code block uses the variable name of the most recently created variable. Mine is set to “pauseTime”.

Click the variable name selector; choose “minutes”.
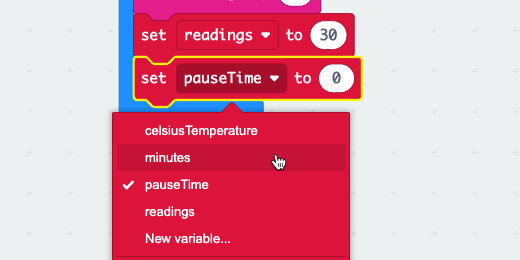
Place another set variable code block into the [on start] section. Select “pauseTime” for the variable.

The pause time variable will calculate the milliseconds for us.
Go to the Math section; find the multiplication operation.

Place the multiplication operation into the set “pauseTime” parameter.

Place the [minutes] variable into the left side of the multiplication operation.

Enter 60000 into the right side of the multiplication operation.
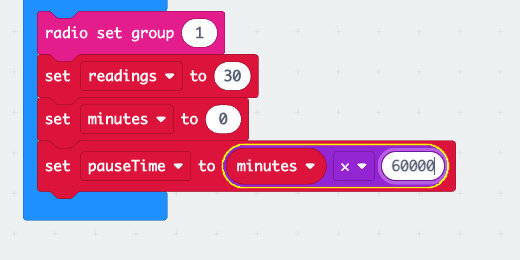
Type the number 1 into the minute's assignment parameter.

Place the [pauseTime] variable into the [pause] parameter.

The loop will pause one minute between readings. With 30 values to gather, it will take half an hour to take all the sensor readings.
To take the same amount of readings in less time we need to calculate the interval between readings. What pause interval do we need to take 30 readings in 20 minutes? We can divide 20 by 30 to give the interval in fractions of a minute. In this example that would be 2/3 or .6667. A reading is taken every 2/3s of a minute.
We don't have to calculate this ourselves. The Micro:bit will work out the math and calculate the correct pause time. It will calculate this time based on the readings we want and the total period.
Go to the Variables section. Create a new variable; use “totalTime” for the variable name.
Place a [set totalTime to] code block in the [on start] section.

We need to reassign the value in the set code we added earlier. The set code that calculates the pause time contains the math to calculate the total time in milliseconds. Click the variable selector and choose totalTime.

Select [pauseTime] in the set variable code block we just added.

To calculate the pause time we need to divide the total time by the number of readings. We know to divide time by readings because we want to know the pause time per reading or between readings.
Go to the Math section; find the division operation.

Place the operation into the [set pauseTime to] parameter.

Get the [totalTime] variable; place it on the left side of the division operation. Get the [readings] variable; place it on the right side of the division operation.

With these instructions programmed, all we need to do is decide on the number of readings and the period for those readings. The program will calculate the regular time interval between each reading.
Sensor countdown
The sensor will start taking readings as soon as button A is pressed. I like to give myself some time to press the button and place the Micro:bit into the environment to begin taking readings. I like to add a countdown timer.
Go to the Loop section; get a Repeat code block. Place the code block in the [on button A pressed] code and before the current loop.
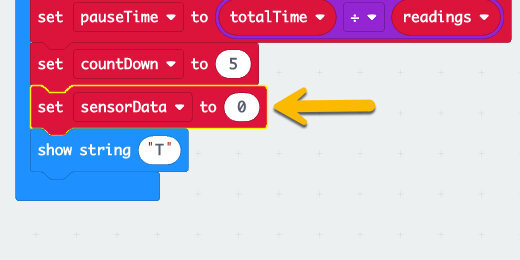
We need a container to hold the countdown numbers. Create a variable and use “countDown” for the name. Place the [set countDown to] code into the [on start] section. Assign the variable a value of 5.

Type the number five into the Repeat loop parameter.

Get the [show number] code block from the Basic section. Place the code block into the Repeat loop.

Get the [countDown] variable; place it into the [show number] parameter.

Get the [change countDown by] code block; place it after the [show number] code. Change the parameter value from 1 to a negative one(-1).

Get a [pause] block; place it after the change variable code. Set the pause duration to one second.

Get the [clear screen] code block from the Basic section; place it after the [pause] code.

Identify the transmitter
The send code for the first Micro:bit is complete. All Micro:bits look about the same. We need a way to identify this Micro:bit from the receiving Micro:bit.
Place a [show string] code block in the [on start] section.

Enter the letter “T” for the string assignment. This will display the letter “T” until we press the button to begin the data collection.

Progress bar
It’s comforting to see something happening on the Micro:bit to know everything is working. I like to include a basic progress meter.
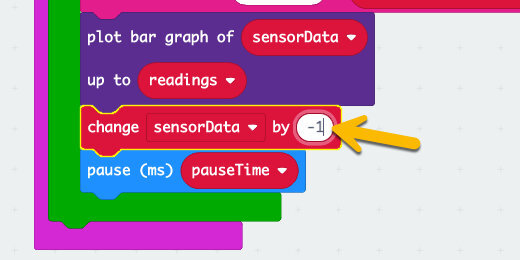
Go to the LED section; find the [plot bar graph of] code.

Place the code after the [radio send value] code.

We need a container to hold the value for the plot. Create a variable; use "sensorData" for the name. Place the [set sensorData to] code into the [on start] section.
Place the [readings] variable into the [sensorData] assignment parameter. The number of sensor data readings is the same number of readings.

Place the [sensorData] variable into the first parameter for the plot data graph code. Place the [readings] variable into the second parameter.

Get a [change sensorData by] code block; place the code after the plot bar graph code. Change the value from one to a negative one(-1).
Test the code
Change the minute assignment value to 1-minute.

Click the button. The Micro:bit simulator will begin with a five-second countdown. The display will fill with light LEDs.

Rows of LEDs will turn off as the data is sent. The count down we created with the sensor data variable is reduced by one each time a value is sent. This is what the graph is plotting.

A progress meter that gets smaller over time is different from your typical progress bar. We can reverse the operation and have the bar grow over time. We are going to use Math to do this!
Remove the [sensorData] variable and set it to one side for a moment.

Go to the Math section; get the Subtraction operation code. Place the code into the plot bar graph parameter.

Place the [sensorData] variable on the right side of the subtraction operation.

Get a [readings] variable; place it on the left side of the subtraction operation.

Press button A to run the program. The bar graph will plot the values going up instead of down.
Change the time to a value that represents the time for the readings you want to collect. Set the number of readings you want to collect during that time.
Download the code to the first Micro:bit.
Receiving Micro:bit
This is the easiest part of the code. The receiving Micro:bit’s job is to receive the data and compile it into a CSV file.
Click the Home button to return to the Make Code for Micro:bit home page.

Click the Create New Project button; set the name of the new project to “sensorReceiver”.

Get rid of the [forever] loop.

Go to the Radio section; get the [radio set group] code and place it on the [on start] section. Make sure the radio group number is the same as that used by the transmitting Micro:bit.

Get the [on radio received name value] code from the Radio section. Place the code on the workspace.

Open the Advanced code section; find the Serial codes section.

Look for the [serial write value] code block.

Place the code block into the [on radio received] code.

The radio received code block contains the information received from the transmitting Micro:bit. This information is stored inside two variables created by the code block. The variables are “name” and “value”
Click the “name” variable and drag it to the parameter on the left side of the equal sign.

Drag the “value” variable onto the parameter on the right side of the equal sign.

variable name being added
This code will collect the data values sent by the other Micro:bit and create a file with the values. The “name” variable represents the title we provided for the temperature, Celsius. The “value” variable contains the temperature values collected from the sensor.

The receiving Micro:bit needs to be connected to the computer while collecting data from the sending Micro:bit. You also need to be on the Make Code IDE site. The site facilitates the collection and compilation of the data into a CSV file.
Download the program to the receiving Micro:bit before pressing the button on the sending Micro:bit.
Plug the other Micro:bit to a power source and press the button. You might need to use a battery in some situations.
A “Show console Device” button appears once the receiving Micro:bit receives the first value. Click the button to watch the data as it is received.

The data received is displayed in the bottom section of the console.
Important: Don’t leave the console page or click on anything else while collecting data. This will interrupt the collection process. You will have to start over if this happens. Press the Restart button on the back of the Micro:bits to start over.

Click the Download button to save the CSV file to your computer when the process is complete.

End notes
The Radio signal from the Micro:bit is not very strong. Lots of things can interfere with the signal. This limits the distance you can be from each Micro:bit to send and receive data. You will need to test for the maximum distance in your environment.