Micro:bit multiple sensor information

Multiple sensor information
The Micro:bit has several sensors that are useful in scientific explorations. They are useful for students that want to create a science project that uses several sensors. The Micro:bit can collect data from all the sensors at the same time. This includes sensors on the Micro:bit and sensors connected to it.
Collecting and storing sensor data is useful for analyzing information over time. The Micro:bit can save the information collected from the sensors to a Comma Separated Value, CSV, file. Open the CSV file with any spreadsheet program to analyze the data and create charts.
This lesson will create a program to collect data from at least three sensors on the Micro:bit. The lesson will cover a fourth sensor option for collecting moisture information.
Here is a science exploration scenario. We have at four plants. Each plant is located in one of the four cartesian coordinates of North, South, East, and West. The purpose of the exploration is to understand how the plant’s exposure to the sun affects its growth. Each plant is cared for by a group of students. They are charged with collecting sensor information three times during the day.
The students will collect information from the light, temperature, and compass. The data will be shared with other students in the class.
A fourth sensor reading is not from one that is part of the Micro:bit. This fourth sensor reading measures the moisture content of the plant. The Micro:bit measures the amount of resistance present in plant soil. Water interacts with the soil to create a medium that conducts electricity. The more water there is in the plant the easier it is for electric current to travel from one electrode to another. One electrode is connected to a pin on the Micro:bit. Another probe is connected to the 3-volt connector. The Micro:bit measures the current flowing from one probe to another. This is similar to an experiment you might have tried where the Micro:bit is used as a conductivity tester.
The Micro:bit is connected to a computer during the sensor information collection process. It needs to be connected so the program can collect and store the sensor information into a CSV file.
Project previews
Use the links below to get a copy of the project from Make Code or Github.
Micro:bit multi-sensor collector (Make Code): https://makecode.microbit.org/_UEMEd9Py248h
Micro:bit multi-sensor collector (Github): https://github.com/digitalmaestro/plantsensordata
The project
The programs will be developed using Microsoft Make Code. This is a free online IDE, Integrated Development Environment. Use the link below to access the online IDE. You don’t need an account to create projects.
Click the New Project button.

Use “plantSensorData” for the project name; click the Create button.

Every new project includes two code blocks on the coding workspace. These blocks include the [on start] section and [forever] loop.
The [on start] section is used to run code as soon as the Micro:bit starts or is restarted. This is where we usually define variables. We will use plenty of variables in our project.
The [forever] loop runs code for as long as the Micro:bit is powered. Code inside this loop does not require any user interaction. We won’t be using the [forever] loop in this project.
Get the [forever] code block and drag it to the Codes Section. Release the code block when a Trash Can icon appears.

We are going to define three variables to hold the different sensor information. Go to the Variables section; click the Make a Variable button.

Use “lightSensorData” for the variable name; click the OK button.

Three blocks are created for each variable. The first block is the variable itself. The Set block is used to assign values to the variable. The values can be numbers, letters, or operations. The Change code block is used to change variables with numbers with some regular amount.

Click the Make a Variable button again. Use “tempSensorData” for next the variable name.
Another block for the variable is created. The other blocks are reused with the new variable name.

Click the Make a Variable once more; use “directionData” for the variable name.

The Micro:bit will collect the data from the sensors when we press one of the buttons. Go to the Input section; find the [on button A pressed] code block.

Place the code block on the workspace.

Go to the Variables section. Get the Set variable code block.

Place the code block into the [on button A pressed] function.

Get another Set variable code block and place it into the button function.

Click the variable selector for the set variable block we just added; select [tempSensorData].

Place another Set variable code block into the button function. Change the variable to [lightSensorData].

We are going to assign a sensor code block to each variable. This will assign the corresponding value from each sensor to the variable.
Go to the Input section; find the [compass heading] code block.

Place the code block into the [directionData] assignment parameter.

Return to the Variable section; find the [temperature] code block.

Place the code block into the [tempSensorData] assignment parameter.

Return to the Variable section; find the [light level] code block. Place the code block into the [lightSensorData] parameter.

The code is set to store the sensor information from each sensor. The information for each sensor is temporarily stored in the corresponding variable.
Collecting and recording the data
To record the data we need to send the data from the Micro:bit to the computer. The information is sent along the cable connecting the Micro:bit to the computer. This uses a standard called Serial communication.
Click the Advanced button to reveal more code sections.

Find the Serial code section.

Find the [serial write value] code block.

Place the code block in the [on button A pressed]; place the code after all the other code blocks.
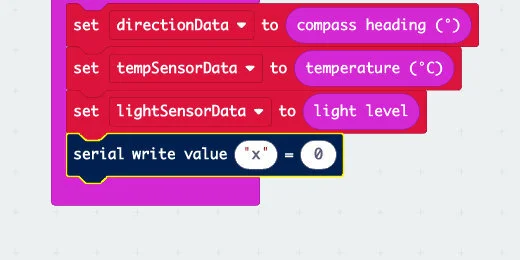
The serial write code block has two parameters. The parameter to the left of the equal sign is used to assign a label to the data placed in the parameter on the right.
Type “direction” into the label parameter.

Get the [directionData] variable from the Variables section; place it into the right parameter.
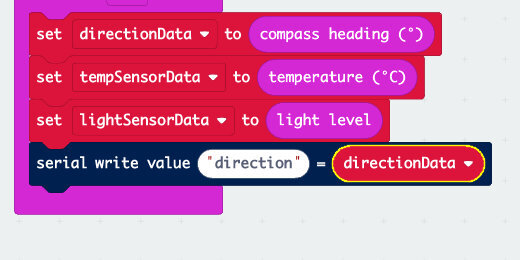
This code block will send the compass heading sensor data to the computer. The data will be given the label “direction”. We will see this in the file later.
Right-click the serial write value code block; select the duplicate option.
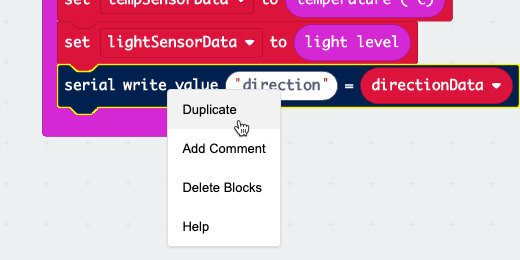
Place the duplicate code block after the current serial write value code.

Click inside the label parameter; change the name to temperature.

Click the variable name selector; choose [tempSensorData].

Duplicate this serial write value code block; place it after the previous code block. Change the label to light. Choose [lightSensorData] from the variable selector.

Compass setup
After pressing the button on the Micro:bit you might be prompted to orient the compass. A message will display across the Micro:bit to tilt the Micro:bit to fill the screen. A smiley face will appear when you have done this successfully.
Upload the code
Whenever we send information from one computer to another it is called uploading. Whenever we receive information from another computer, it is called downloading.
Connect the Micro:bit to your computer. Click the actions menu and select Download to Micro:bit.

There is a Micro:bit simulator on the left side of the workspace. We won’t be using the simulator. Press button A on the real Micro:bit. A button appears under the Micro:bit simulator. Click the “Show console device” button.

Three scrolling graphs appear in the top part of the console section. The scrolling graphs are used to chart continuous data received from the sensor. Our program is collecting one set of data values at the moment we press the button. No data is plotted on the graphs because we only have one value. The one value collected appears in an orange pillbox.
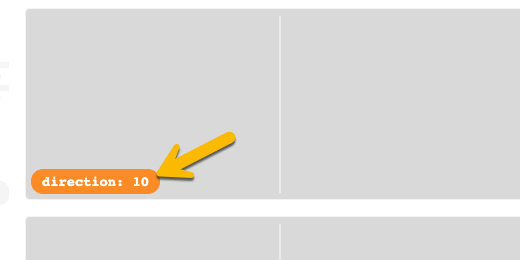
The bottom of the console page displays all the values collected from each sensor. The values include the labels we assigned in the write value code block.

Students will write these values in a table or open them in a spreadsheet.
The values are available in a CSV file. Click the download button to get a copy of the file.

The CSV file
Opening the CSV file in a spreadsheet shows the data values under each of the corresponding labels. The file includes other columns of information. These labels refer to the time when the data was collected. Each time label is followed by the source label. The time label will always be zero for this program.

Water sensor data
This sensor configuration is optional.
Detecting the amount of water in a potted plant requires two alligator clips and two pieces of wire. The pieces of wire are the probes we stick into the soil. I like to use paperclips because they are found everywhere and a box of them is cheap. The probes don't have to be made from wires; they can be nails or screws.
One alligator clip connects to any available pin. These pins include pins 0, 1, and 2. The other alligator clip connects to the 3-volt connector. The other end of each alligator clip connects to one of the wire probes.
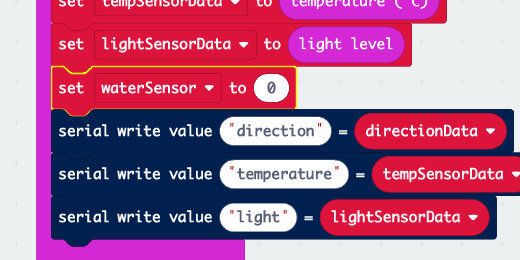
Create a variable; use “waterSensor” for the variable name. Place the Set variable code block into the button A pressed function.
Find the Pins code section under the Advanced codes area.

Find the [analogue read pin P0].

Place the code into the variable assignment parameter for the water sensor.

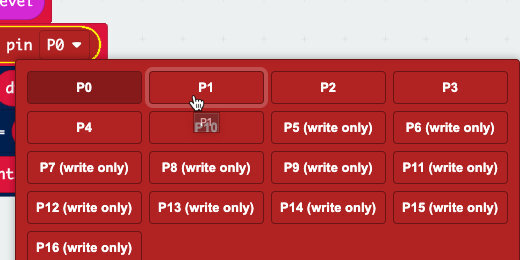
Click the Pin selector; choose the connector where your alligator clip is connected. The options are P0, P1, or P2.
Make a copy of the serial write value code. Change the label to water and the variable to [waterSensor].

Download this code to the Micro:bit. Collect data from all the sensors.