Collect data from multiple micro-bits

Sensor data from multiple micro-bits
Many classroom teachers might have one Micro:bit per student or one per group. This arrangement is nice for most applications. There are applications where we need more than one Micro:bit. For example, when we need to collect remote sensor information and send that information to a Micro:bit connected to a computer.
In another example, we need to collect remote information from several Micro:bit devices. Each device needs to pair with a separate Micro:bit to collect the data.
This lesson focuses on using several Micro:bits to collect sensor information and relay that information to one Micro:bit. The one Micro:bit is connected to a computer to collect data and save it to a Comma Separated Value, CSV, file.
Project previews
Use the links below to get a preview of the final project.
Sensor Data transmitter (Make Code): https://makecode.microbit.org/_3EzC8P6DoFch
Sensor Data transmitter (Github): https://github.com/digitalmaestro/datatransmitter
Sensor data collector (Make Code): https://makecode.microbit.org/_bLW8Kf91PcTe
Sensor data collector (Github):
https://github.com/digitalmaestro/datareceiver
The project
Use the link below to access the Micro:bit development environment. You don’t need an account to begin creating projects for Micro:bit.
Click the Create new project button.

Use “dataTransmitter” for the project name; click the Create button.

Every new project includes two code blocks on the coding workspace. These blocks include the [on start] section and [forever] loop.

The [on start] section is used to run code as soon as the Micro:bit starts or is restarted. This is where we usually define variables. We will use plenty of variables in our project.
The [forever] loop runs code for as long as the Micro:bit is powered. Code inside this loop does not require any user interaction. We won’t be using the [forever] loop in this project.
Get the [forever] code block and drag it to the Codes Section. Release the code block when a Trash Can icon appears.

The data from this Micro:bit will be sent to another Micro:bit. That Micro:bit will collect and store the information sent to it by each data transmitting Micro:bit.
Radio activation
To send data from one Micro:bit to another, we need to activate the Radio. Go to the Radio codes section. Find the [radio set group] code block.

Place the [radio set group] code block into the [on start] section.

The Radio Group code block uses a number to represent the channel for transmitting and receiving information. This channel links two or more Micro:bit devices. Micro:bits that need to communicate with one another need to be using the same group number or channel. We can use any channel from 0 to 255. That’s a total of 256 channels.
The group is set to channel 1 automatically. This channel is fine to use unless you get interference from other classroom Micro:bits. Make sure to use the same group number for the sending and receiving Micro:bit.
Go to the Input codes section. Find the [on button A pressed] code block.

Place the code block on the workspace.

When the button A is pressed the Micro:bit will send sensor information to a listening Micro:bit.
Go to the Variables section; click the Make a variable button.

Use “temperatureData” for the variable name; click the OK button.

Three blocks are created for each variable. The first block is the variable itself. The Set block is used to assign values to the variable. The values can be numbers, letters, or operations. The Change code block is used to change variables with numbers with some regular amount.

Get the [set temperatureData to] code block; place it into the button A pressed function.

Go to the Input codes section; find the [temperature] code block.

Place the code block into the set variable parameter.

The value from the temperature sensor is now stored in the [temperatureData] variable.
Go to the Radio code section; find the [radio send value] code block.

Place the code block into the button A pressed function. Place the code block after the value assignment.

The send value code block has two parameters. This is known as a Name-value pair. The first parameter is a label for the value in the second parameter. The label is usually something like the word temperature to identify the sent value as the temperature. When collecting data from multiple Micro:bits it is useful to know where the information came from.
Labels in the name-value pair are limited to 8 characters. I use the student or group name along with the data label. For example, 'Alextmp' or 'Grp01tmp'. I use this information to group and sort the data in a spreadsheet later.
Type ‘Grp01tmp’ into the label parameter.

Go to the variables section; get the [temperatureData] variable and place it into the second parameter.

This is the basic code needed to transmit sensor data from one Micro:bit to another. The code sends one piece of sensor information. Let’s add more sensor information to send. We’ll add the light sensor data to our set of data sent to the Micro:bit.
Go to the Variables section; click the Make a variable button. Use “lightData” for the variable name.

Get the [set lightData to] code; place it in the button A pressed function. Place it before the radio \\[send] value code block.

Go to the Input section; find the [light level] code block.

Place the [light level] code into the [set lightData to] parameter.

Get a [radio send value] code block from the Radio section. Place the code block at the end of the code blocks in the button A pressed function.
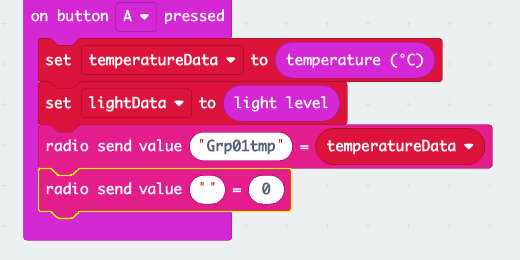
Set the label to ‘Grp01lgt’.

Get the [lightData] variable; place it into the second parameter.

Repeat this process with other sensor values you want to send.
Download to the transmitter
Connect your Micro:bit to the computer. Click the action menu button. Download this program to the sending Micro:bit. Eject and disconnect the Micro:bit.

You can download this code onto different Micro:bits using one computer. All you need to do is change the group name.
Receiving Micro:bit
Click the Home button to return to the main Make Code page for the Micro:bit.

Create a new project. Use ‘dataReceiver’ for the project name.
Get the [radio set group] code block; place it into the [on start] section. Make sure the group number is set to the same number used in the transmitting Micro:bit.

Go to the Radio code section; find the [on radio received] code block.

Place the code block on the workspace.

Click the Advanced section button.

Select the Serial code section; find the [serial write value] code block.

Place the [serial write value] code block into the [on radio received] code.
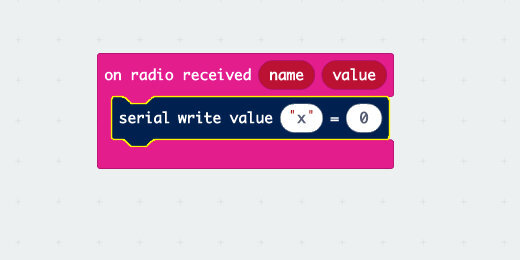
The [serial write value] code has two parameters. These parameters are like the ones we used in the radio send code. The left parameter is for the label and the right is for the value. The values for these parameters are stored in the radio received code.
Click the ‘name’ parameter and drag it down into the label parameter.

Drag a copy of the ‘value’ variable into the right parameter of the serial write value code.
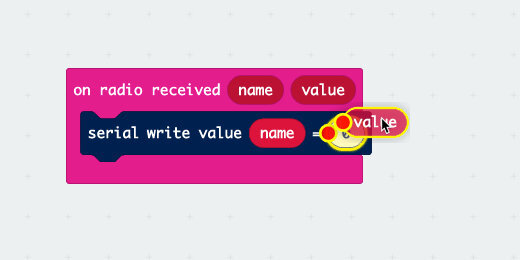
This is all the code needed for the receiving Micro:bit. Download the code to the Micro:bit. Leave this Micro:bit connected to the computer. Don’t leave the Make Code development environment. It needs to be open to collect the data and prepare it in a CSV file.
Collecting data
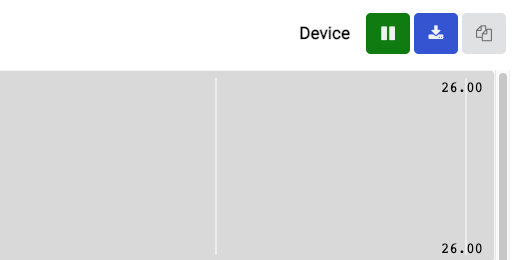
Press the button on one of the data collection Micro:bits. This activates the data collection mode on the Micro:bit and the development environment. The Micro:bit and the Make Code IDE is accepting data when you see the Show Console Device button. Click the button to enter the data display and collection portal.

Proceed to collect data from the Micro:bits once you are in the console. The values are displayed in the section at the bottom of the console. This Micro:bit has collected sensor data from three Micro:bit devices.

The collected data can be downloaded using the download button.