Micro:bit smart LED dimmer

Smart light sensor dimmer
Sensors on the Micro:bit and a little programming allow us to develop products that respond to input from the world in ways that produce desirable results.
Light sensors are used in a variety of real-world applications. Light sensors are used in outdoor lights to turn them on when it gets dark. The same sensors turn the lights off when the sun is out.
Sensors and programming help create sophisticated applications.
The light sensor on the Micro:bit can be used to gradually make adjustments based on the ambient light. I covered this in the light sensor basics with a simple application.
Use the link below to see the light sensor introduction lesson.
Turning lights on or off when the ambient light changes is a basic smart switch. In the introductory lesson, we adjusted the LED brightness using the ambient light to control the brightness. As the ambient light rose, the LED lights got brighter. This isn't very useful because we don't need the LEDs to get brighter as the ambient light gets brighter. We need the opposite to occur.
Project objective
This project integrates some basic math along with process skills. The project aims to create a responsive sensor like that used in modern cars.
The display in modern cars decreases the panel lighting to compensate for the brightness of the daylight hours. The display gradually increases as the sun goes down. The brightness is not increased too much. Just to a comfortable level. This setting is often adjustable by the driver or passenger.
The project uses the light sensor to gradually decrease the LED luminance as the ambient light gets brighter. The Micro:bit will also gradually increase the luminance as the ambient light gets dimmer.
Use the link below to get a copy of the final product.
Smart LED dimmer (Make Block Micro:bit)
Smart LED dimmer (Github)
Development
You don’t need to have a Micro:bit to learn about the Micro:bit. Microsoft provides a free online Micro:bit simulator. No login account is required. Use the link below to access the simulator.
The simulator is also the environment we use to create code for the Micro:bit.
Download the completed project using the link below.
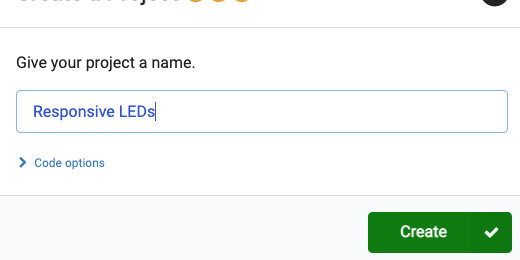
Click the New Project button.

Set the name of the project to “Responsive LEDs”; click the Create button.
Each new project includes two code blocks. The [on start] code runs instructions the moment the Micro:bit powers up or is restarted. The [forever] loop runs code in the loop for as long as the Micro:bit is powered.
We need something to look at when adjusting the display brightness. Go to the Basic code section; look for the [show icon] code block.

Place the code block inside the [forever] loop.

We want the responsive light meter to begin with standard light measurement. That standard measurement for this project will be the midpoint for the light sensor.
Go to the Basics code section; find the [show number] code block.

Place the code block in the loop and below the icon code block.

Go to the Input code section and find the [light level] code block.

Place the code block into the [show number] parameter.

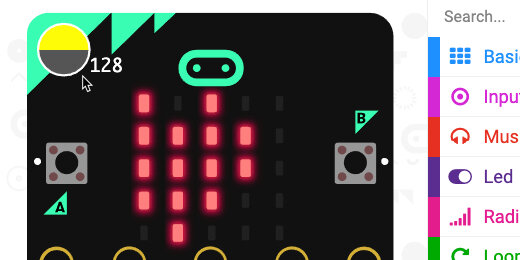
This code block displays the sensor reading from the Micro:bit. Look at the Micro:bit simulator. There is a brightness simulator icon in the top left corner. The simulator is also a meter for the amount of light that is being received by the sensor. The simulator shows that that the sensor is sensing about half the light it can register. This reading is in the simulator. The physical Micro:bit uses an estimate of the ambient light.
The LEDs used to sense light are not as accurate as using a Light Dependent Resistor(LDR). This is an independent component dedicated to converting light into electrical signals. The Micro:bit uses some algorithms to get a fairly accurate representation of the ambient light strength.
The light sensor returns a range of values from 0 to 255 (0 is dark and 255 is bright). The reading of 128 is right in the middle.
This is a good value to use for comparison.
The Micro:bit needs to make decisions based on the base reading of 128 and the ambient light.
We are using conditional statements to make our decisions. Conditional statements include statements like “If something is True Then take this action”. The opposite of this statement is that “If something is False then take an action”. The action taken depends on what we want to do.
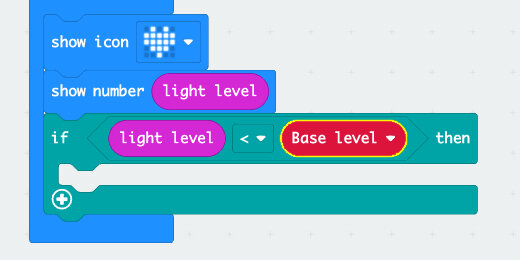
Go to the Logic section; look for the [If True Then] code block.

Place the condition statement inside the loop and below the [show number] code block.

The condition statement is looking for something True. We need to provide something to return a True or False response.
Look for the “Less Than” comparison code block in the Logic section.

Place the comparison code block into the condition statement parameter.

Go to the Input section and get the [light level] code block. Place the code on the left side of the comparator.

We want to compare the ambient light level to our base, 128. Type 128 into the right side of the comparator parameter.

The condition will compare the ambient light level to 128. If the light level is less than 128, then it will perform the instructions. We will get to that in a moment.
Variables
We typed 128 as the parameter into the comparator. In the future, we might want to change the base comparison to something else. Hard coding this value into the code is not a good idea if we intend to change the value in the future. Using a variable makes it easy to update the value for all the parameters in our program.
Go to the variables section and click the Make a Variable button.

Use “Base level” for the variable name: click the OK button.

Get the [Base level] variable.
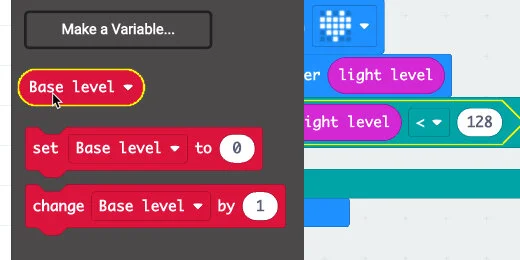
Place the variable into the right side of the comparator; in place of the value.
Go back to the Variables section; get the [set variable to] code block.

Place the code block inside the [on start] code; set the value to 128.

When the ambient light increase or decreases, we want the light to increase or decrease proportionally. To do this, we need to get the difference between the ambient light and our base. We need to compensate for the difference and add the difference.
We need another variable to help with the math operations.
Go to the variables section and create another variable. Use “light” for the variable name.
Get the [set light to] variable block.

Place the block inside the condition statement.

We need to determine the difference between the base light and the ambient light. Go to the Math section. Get the subtraction code block and place it in the variable parameter.

Place the [Base level] variable into the left side of the operation.
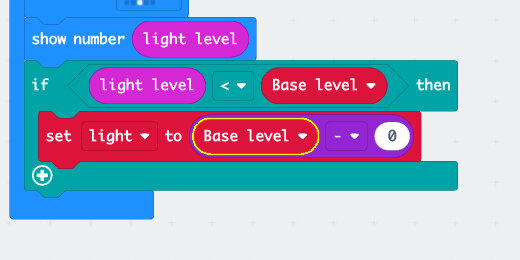
Get the [light level] input and place it on the right side of the operation.

This takes the base light level of 128 and subtracts the ambient light. For example, if the ambient light is 90, the difference is 128 - 90 or 38.
We want to increase the light level by this amount. The amount has to be increased beyond the 128 base value. We need to add the difference to the base to increase the light level.
Go to the LED section and the more subsection; find the [set brightness] code block.

Place the code block inside the condition statement and after the [set variable to] code block.

Place an addition operation code block from the math section into the [set brightness] parameter.

Get the [light] and [Base level] variables. Place the [light] code into the left side of the addition operation. Place the [Base level] code on the right side.

Let’s test the sensor. Adjust the lightness meter to any value less than 128.
It isn’t easy to tell if the LEDs are getting brighter in the simulator.

Sensor feedback
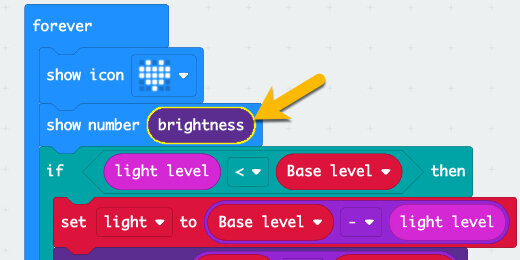
We need a way to verify that the program is working. The number scrolling across the display is that of the ambient light level. We need to display the LED brightness level instead.
Go to the LED section and the More subsection. Find the [brightness] code block.

Place the [brightness] code block into the [show number] parameter.
Return to the simulator and adjust the light meter. The meter in my simulator reads 112. The number scrolling across my display reads 144. The difference between 112 and 128 is 16. When we add 16 to 128 we get 144. The brightness of the LEDs has increased.

Dimming the LEDs
Reducing the brightness uses the same process. The math is slightly different.
Right-click on the condition statement; select duplicate.
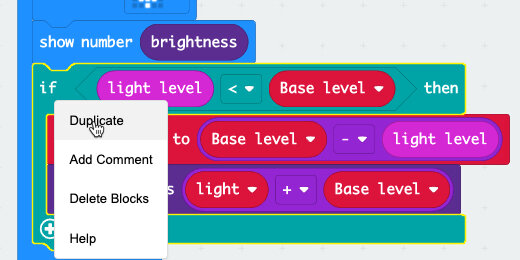
Place the duplicate condition statement below the first.

We need to see if the ambient light is greater than the base light. Change the less than symbol to greater than.

We need to subtract the base light from the light level. There are a couple of ways to do this next step.
Absolute values
The first option is to remove the [Base level] and [light level] code blocks from the [set variable to] code. Set them to one side.

Put the code blocks back. Place the [light level] into the left parameter and the [Base level] into the right parameter.

Here is another way to do the same thing. This is good when you get into studying absolute values. I put the code blocks back the way they were.
Get the [absolute of] code block from the Math section.

Place the block on the canvas outside the code.
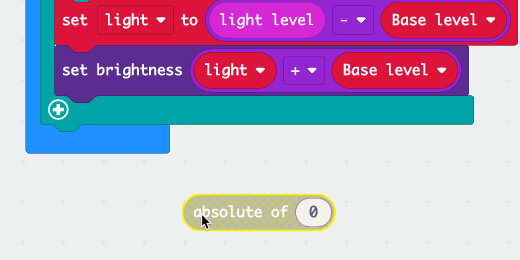
Move the mouse arrow over the subtraction operation. Make sure the operation is surrounded by a highlight.

Place the operation block into the [absolute of] parameter.

Place the [absolute of ] code block into the [set light to] parameter.

Now we need to set the brightness. We need to subtract the ambient light from the base light level. Switch the [light] variable and the [Base light] variables. Change the addition to subtraction.

Go to the simulator. Reduce the brightness level. Dim LEDs are easier to see in the simulator.

One more thing
We don’t need the feedback to display across the Micro:bit. Grab the [show number] code block and move it out of the loop. The attached code below is moved along with this one block. Put the code block back in place.

There is a better way to remove just one code block without having to juggle lots of code blocks around.
Hold the Option key on your keyboard while dragging the code block away. This isolates the one code block from the others.

Take the code block to the codes section.

The program is complete. Send the code to the Micro:bit if you have one.