
Technology lessons for educational technology integration in the classroom. Content for teachers and students.
Create Class OneNote Notebooks with Microsoft Classroom
Microsoft Classroom Notebook makes a great companion for Microsoft Teams. In this book, you will learn how to create, distribute and manage student OneNote notebooks. With OneNote Notebooks you can distribute and collect assignments from students. The collection process is seamless.

Introduction
A Class Notebook can be accessed with the OneNote application once it has been created with the Cloud service. OneNote is available for a variety of devices. These devices include Windows desktops, laptops, Surface tablet, iPad, iPhone, Chromebook, and various Android devices.
A Class Notebook includes three sub-notebooks. These notebooks include Student Notebooks, Content Library, and Collaboration Space. The Student Notebook is a notebook that is accessible to individual students and to the teacher. Student notebooks aren't viewable by other students. The Content Library notebook is a notebook where teachers can share material with students. The content in this notebook cannot be edited by students. The last notebook, Collaboration Space, is used for teachers and students to work on collaborative assignments and projects. This section can be edited by teachers and students. All these notebooks are created at the end of the setup process we will be going through in this first lesson.
Creating A Class Notebook
To create a Class Notebook, log into your Office 365 account and click on the application launcher. The application launcher is usually available from within any of the Office 365 online applications like Outlook. The launcher is located in the upper left corner of the page.

Office 365 application tiles
Click on the Class Notebook tile.

Office 365 Class Notebook application
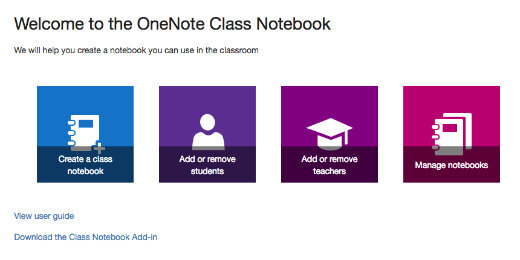
The Class Notebook page will open. The page has four tiles to help create and manage Class Notebooks. Click on the “Create a class notebook” tile.
OneNote Class Notebook portal
A series of steps will be listed on the left side. Office 365 will guide us through the process of creating a Class Notebook.

Class Notebook creation process
Provide a name for the class or content that is to be taught. The name of the notebook can be anything relevant to instruction. Special class notebooks can be created for special projects like science fairs or projects. Click the next button.

A message page will inform us that several notebooks will be created. Click the next button.

Overview of content to be created in each notebook
We have the option to include other teachers in this notebook. This is an opportunity to provide the names of other teachers or aides that will be either co-teaching, supporting, or providing instructional content for curriculum and lessons. These teachers will have the same access to the notebook as the teacher that creates the notebook. This means they can view student notebooks and access common classroom sections like the Content Library and Collaboration Space. Teachers do not have access to other teacher notebooks, which are also created during this process. Provide the email address of other teachers if this Class Notebook is going to be shared with another teacher in the organization.
Teachers don't need to be entered at this time. Teachers can be added later in the Manage Notebooks section. We will cover this step later.

Add teachers to notebook management
The next step in the process is to provide the email address of students that will need access to this notebook. Each address can be entered individually or pasted from another application. If the addresses are going to be pasted, each address must be separated by a semi-colon.
Student emails don't have to be entered at this time. It might be better to create the notebook and set up everything before students are invited to the Class Notebook. Students can be added later using the Manage Notebooks section.
If student email addresses aren't available yet, or if you don't want to add students now, click the next button.

Add students to Class Notebook
Class Notebook creates four default sections in each student notebook. These include handouts, class notes, homework, and quizzes. We can add more sections at this time by clicking the “Add more” button. Sections are places where students can create their content for teachers to review and grade. It also provides a way for teachers to help students organize their work and for teachers to quickly access student assignments. Additional sections can be added later in the Manage Notebooks section. We’ll use these default sections and click the next button.

Default sections for each notebook
Click the “Create” button to finish the process.

Overview of content created for notebooks
The Class Notebook is ready and can be opened with OneNote. The OneNote application can be installed on a computer or device. Notebooks can also be opened with OneNote online, which is the Cloud service option for OneNote. Click the option to open OneNote online.

Open OneNote online
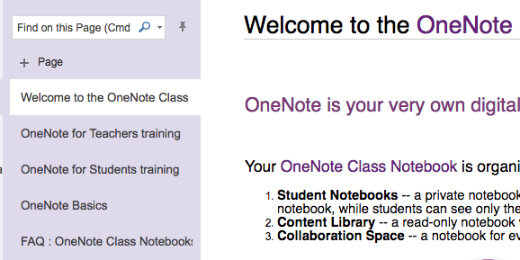
OneNote online will open in a browser and display a welcome page. The notebooks section contains a list of notebooks created under the Class Notebook. In this example, that would be the Physical Science notebook. The Notebooks section includes Collaboration Space and Content Library. Each has information and instructions for using the notebook. Click on the Notebooks link.

OneNote online with teacher notebook
The Notebooks page will open, which contains Class Notebooks and personal notebooks.

Class Notebooks management section
Clicking the Class Notebooks menu option will list the Class Notebooks only. Click the Class Notebook link.

Class notebooks list
Each notebook has pages for taking notes. There are several pages created for us with each Class Notebook. These pages contain information for using the notebook. To create a new page, click the “+ Page” link.
Default pages in teacher notebook
Once the page is created, a cursor will be placed at the top of the page to provide a title. This title will appear in the pages panel for easy navigation to each page.

New page
Press the Return key on the keyboard or click below the title to begin adding content.

Page title and content area
Student Notebooks In-Class Notebook
Student notebooks appear in the Notebooks panel. These notebooks are automatically created and added when student accounts are added to the Class Notebook. They are listed in alphabetical order below Collaboration Space and Content Library.

Teacher view of student notebooks
Click on the disclosure triangle to view the contents of each student’s notebook. Each notebook contains the default sections that were created during the setup. Each section has its own set of pages. Sections are notebooks within a notebook.

Sections in student notebooks
Any work that is done in either the online, desktop or mobile device version of OneNote is automatically saved and synced to the Office 365 Cloud.