Basic Navigation with mBot and the remote

The mBot robot from Makeblock is a good STEM tool. The robot is a motorized vehicle with basic motor controls and sensors. The controller has several sensors, LEDs, and a small speaker. There are plenty of things we can do with this robot. One fun option is to drive the robot around. The kit comes with a remote.
In this lesson, we are covering the fundamentals for controlling the mBot with the remote. We will cover the button options for driving the robot around.
Connect the mBot to your computer with a USB cable. Open the mBlock application or use the online version at https://ide.mblock.cc/#/. Click on the untitled name box.
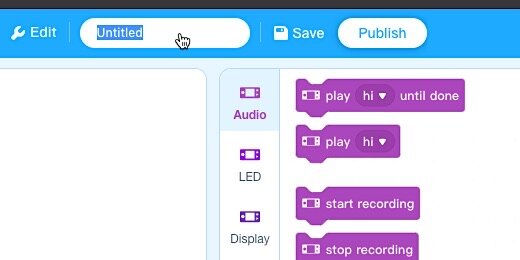
Set the name to Drive with remote.

Click the Save button.

Login with your account information.

Go to the Devices section; click the Add button.

Select the mBot device library.

Return to the Devices section; remove any other device libraries. This avoids conflicts with other libraries that don’t work with the mBot.

Go to the Control functions section; place an if…then…else block onto the canvas. An if…then…else code block checks if something is true or false.

Go to the Sensing functions section; place the IR remote pressed block into the if…then parameter. This is the parameter used to check if it is True or False; if the button is pressed or not.

Use the button selector and choose the Up button.

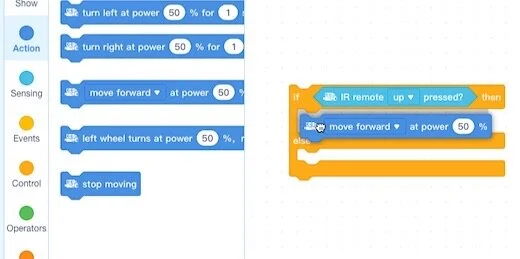
Go to the Action functions section; place the move **forward at power** block into the Then space. If the button pressed is the Up button, True, then the robot will move forward at 50% power.
We need to provide instructions if another button is pressed. This requires another code block to evaluate the press of another button. Go to the Control functions. Place an **if…then…else** block inside the **Else** area of the other **if…then…else** block.

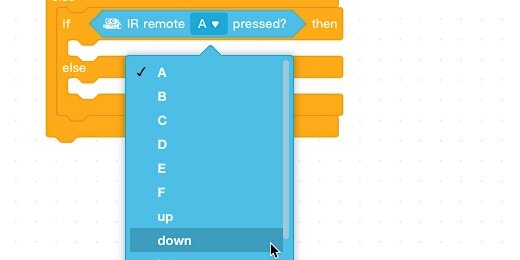
Place an **IR remote** block from the Sensing functions inside the if…then parameter.

Change the button pressed; select the down button.
Place a **Move forward at power** into the **If…then** section.

Click the Move forward selector and choose the move backward option.

Place and **if…then…else** code block into the else portion of the previous code block.

Place the IR remote code into the **if…then** parameter. Select the Left button option.

Place the **Move forward** code block into the **if…then** section of the code. Use the Turn left option for the motion.

Place an **if…then…else** code within the else portion of the previous code. Place an **IR remote** code in the if…then parameter and select Right for the button option. Place a **Move forward** code block into the if…then section of the code; choose right for the motion parameter.

We are done with all the basic motion options.
The Loop
The robot controller needs to keep checking for a button to be pressed on the remote. We need to place these condition statements inside a loop.
Go to the Control functions section; find the Forever loop code.
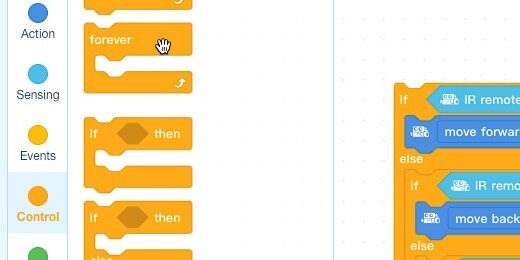
Move the Forever loop over the condition code blocks. Move it toward the beginning of the code. We want the code to wrap around all the condition code blocks. Look for a gray shadow of the Forever block to wrap itself around the condition code. Release the block when the shadow appears.

The Forever loop must be wrapped around all the condition code blocks.

We are done with the code. Make sure the robot is connected to the computer and turned On.
Click the Upload button.

Go to the Events functions. **When mBot starts up** block should be the only one available for selection.

Attach the **When mBot starts up** code to the beginning.

Click the Connect button.

Select the communication port for your robot and connect.

Click the Upload button.

Wait for the code to upload to the robot controller. Place the robot on the floor. Press the Up button to move forward. Press the Left or Right buttons. Press the Down button.
Go and play for a while. I'll be here when you are ready for the next part.
The robot moves in the direction the button is pressed until another button is pressed. This is fine but it may lead to some crashes. It also makes it difficult to place on a table when we need to update the code.
Turn the robot Off for now and connect it to your computer.
Go to the Action functions; add the Stop moving code to the Else portion of the last condition code block.

This code block will stop the robot from traveling endlessly. It will stop if none of the required buttons is pressed.
Hold the robot in one hand or have a partner hold the robot. You can also place the robot upside down if it has a protective case around the controller. Turn the robot On.
Click the Connect button. Select the communication port. Upload the updated code.
Place the robot back on the floor. Press and hold the Up button. Release the button and the robot will stop moving. Press and hold any of the direction buttons. The robot moves only while one of the required buttons is pressed.
This option makes it easier to navigate and control the robot’s movements.