While Loop on mBot

In this lesson, you will learn how to use a loop to accelerate and decelerate. Loops are an important part of developing autonomous programs. The purpose of a robot is to perform a series of tasks. Most tasks are specific to a particular objective. Many tasks include repetitive operations. Robots can perform repetitive tasks all day long.
This lesson will cover a simple task. The robot will gradually accelerate to its top speed; it will then reduce speed to a full stop.
We will be using the remote to start and control the process.
The link to the finished code is available below.
https://planet.mblock.cc/project/502092
We are building the program with the basic building blocks that are particular to this task. The aim is to show you how programmers develop programs. Programmers build and test parts of the program as they go. The program evolves to become the completed product. Testing is important during the development process.
The online version of the mBlock coding environment is at https://ide.mblock.cc
Building the program
Open the mBlock application. Click inside the project name field and set the name to accelerate-decelerate. Click the Save button.

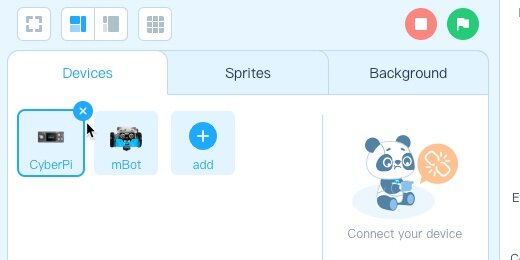
Go to the Devices section and click the Add button.

Select the mBot library; click the OK button.

We can set the mBot library to be loaded each time we create a new project. Click the Star icon. The mBot library will load each time a new project is created.

Delete other Device libraries. This prevents us from accidentally selecting code blocks that don’t work with the mBot.
We want the robot to move forward and accelerate. The process begins when the Up button on the remote is pressed.
Go to the Control functions section and place an **if…then** code block on the canvas.

Go to the Sensing section and get the **IR remote pressed** code. Place it into the **if…then** parameter.

Choose the **Up** option from the button selector.

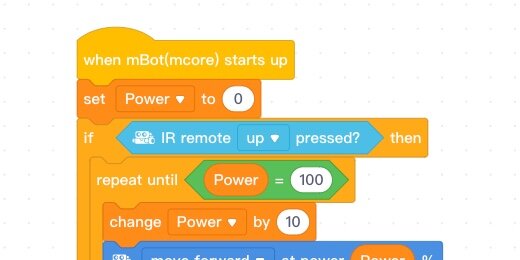
We want the robot to slowly accelerate when the Up button is pressed. To perform the acceleration process we need to use a loop. We want the loop to repeat until it reaches the maximum velocity.
We don't know the robot's velocity. We only know the amount of energy applied to the robot motors. The energy is supplied by the batteries. The batteries supply current to the robot's controller and the motors.
The energy we supply to the robot's motors is like the gas pedal on a car. We supply fuel to the engine and the engine, in turn, uses the fuel to propel the car forward. A speedometer in the car lets us know how fast we are going.
The robot does not have a speedometer, so it's like driving a car without a speedometer. We don't know how fast the robot is traveling. We can take some measurements and perform a bit of math to know the robot's acceleration and velocity.
There are three loop options we could use. We are using the repeat **until loop**. We are using this loop because we want the robot to accelerate **until** it receives the maximum amount of energy available.
Go to the Control section. Place a **repeat until** loop within the **if…then** condition.

Go to the Action section. Place the **move forward at power** code block inside the loop.

We need a way to increase the power applied to the motors. The power applied to the motors is based on a percentage of the available battery power. The current value in the move forward code is constant. It doesn't change while the program is running. To update the percentage, we need a variable.
Go to the Variables section; click the **Make a Variable** button.

Use **Power** for the variable name. Select the option to use this variable for this sprite only. Click the OK button.

Grab the Power variable.
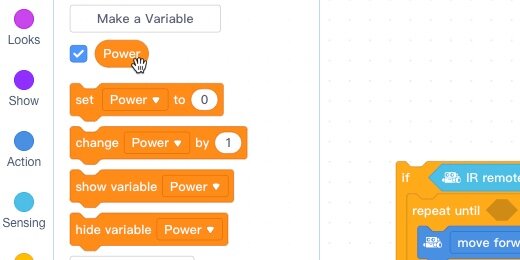
Place the variable into the Power parameter.

The variable accepts input from several sources. Attach the **set Power** code to the beginning; before the **if…then** code.
It is recommended to initialize variables before they are used. This block is not in the loop because it sets the initial value of the power before it is changed. The initial value is set to zero.

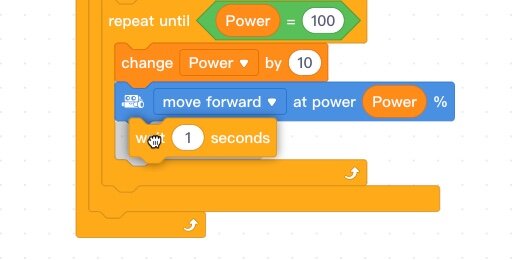
Place the Change Power code inside the loop and above the Move forward code. This code, increases, the value of the power applied to the motors. The value for the power ranges from 0 to 100 percent. The power can be increased by any increment we want. The increment determines the rate of acceleration. Small increments result in slow acceleration. Large increments result in a fast acceleration.

Let’s begin with an increment of 10 percent. Place 10 inside the parameter.

This will repeat until the robot reaches a maximum of 100 percent. The loop needs a condition. The condition informs the loop when it is time to stop looping.
Go to the Operators section. Look for the **Equal to** operator. This is an evaluation operator. It evaluates if something is equal to something else. This isn't like the equal sign in traditional math. This sign looks to see if two or more values are the same.
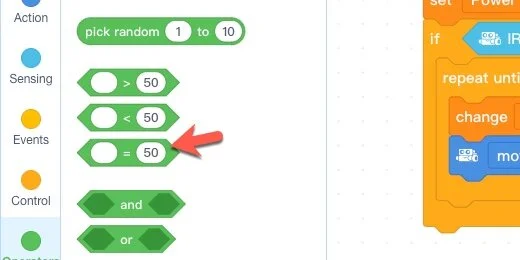
Place the evaluation operator inside the repeat parameter.

Go to the Variables section. Place the Power variable inside the left side of the evaluation.

Change the value from 50 to 100.

This is a good place to stop and test what we have done. The robot is going to be moving, so we need to make sure it stops at the end of the loop. Go to the Actions section; place the Stop moving code at the end of the if..then code.

Connect the robot to the computer and turn the robot On. Click the Connect button. Select the port for your robot and complete the connection.

Click the Upload button.

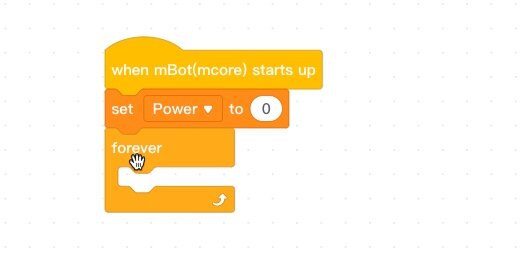
Go to the Events section. Attach the When mBot starts up code to the beginning.
Click the Upload button.
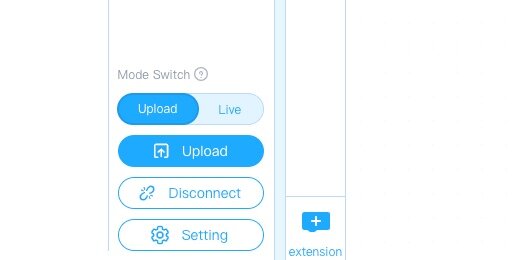
Disconnect the robot and place it on the ground. Please, don’t do this on a table or desk.
Press the Up arrow on the remote.
**Nothing is happening!**
Sorry, I set this up as our first bug in the code. I often make this mistake.
It also provides a teachable moment.
Code that is waiting for input from a user needs to be placed in a Loop. This forces the code to keep checking for input.
Connect the robot back to your computer. Detach the if…then code from the set power code.

Get the Forever loop from the Control section and attach it below the Set Power code.
Take the If…Then combined code blocks and place them within the Forever loop.

We can upload this code to the robot and the robot will receive the command from the remote. The robot will power up and move forward. You will see it move away at the fastest speed. It won’t perform a gradual acceleration. This introduces another bug.
The controller processes the instructions very fast. The processor on the controller is not as fast as the one on your typical computer. It is still fast. It processes information at 16 MHz. That is 16 Mega-Hertz or 16 million instructions per second!
The processor increases the speed so fast that it reaches 100 percent almost instantly. We need to slow things down.
Go to the Control section and place a Wait 1-second delay after the Move forward code. With the code, the robot will move forward at a certain Power for One Second. The Power will increase to the next level and the robot will move at that Power level for One Second. It will repeat this process until the power level reaches 100 percent.
The robot is set to accelerate until it reaches 100 percent of the available power. It will keep going unless we do something to slow it down or stop it. Give it a try. No bugs this time.
Not on the table or desk!
Let’s slow the robot and bring it back to a stop after accelerating. The next process is to decelerate the robot. The code to do this is almost identical to the code for acceleration.
Move your mouse pointer over the Repeat until code. Right-click on the code; select duplicate.

The duplicate code attaches itself to the mouse pointer. Move the pointer to the end of the **Repeat until** code. Wait for the code blocks to separate; release the code. The code must be right after the first repeat until code.

The second code will repeat the loop until the Power level is zero. Place the number 0 into the comparison operator for Power.

We need to decrease the power supplied to the robot through each cycle. Change the positive 10 increments with negative 10, -10.

That is all we need to do. The robot will accelerate up until it reaches 100 percent of the available power. It will then begin to decelerate until no more power is sent to the motors.
Some lights
I like to add some visuals to my robot code. It provides feedback, so I can see at what stage of the code the robot is operating.
Go to the Show section. Get the **LED all** code. Attach it to the first repeat until loop at the beginning.
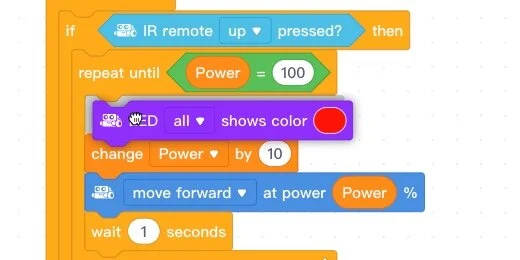
Click the color selector and move the color slider; choose green. When the LEDs are green, I know the robot is in the acceleration loop.

Add an LED code block to the second repeat loop. Place it in the same position. Leave the color set to red. When the LEDs are red, I know the robot is in the deceleration loop.

Place one last LED code block outside the second repeat loop. Select the color picker; move the brightness slider to the left. This turns the LEDs off.

Upload the code to the robot. Place the robot on the floor and press the Up arrow on the remote.
The program is in a loop. Press the Up arrow when the robot stops to repeat the process.