
Technology lessons for educational technology integration in the classroom. Content for teachers and students.
Basic math problem generator with Google Sheets
In this lesson, we are creating a math assignment generator. We are using Google Sheets to generate math problems. The math problems include basics like addition, subtraction, division, and multiplication. The problems are copied to a Google Doc and formatted for distribution to students.

Introduction
Practice assignments are important when learning a concept. Practicing problems helps students hone their skills and understanding. There was a time when worksheets were used to drill students on skills. This eventually was overdone because teachers used them for everything. Worksheets were termed drill and kill.
Practice assignments apply skills repeatedly. It is similar to developing muscle memory. In this case, they are developing mental or skills memory. Skills memory is important for standardized assessments.
Students quickly forget skills and concepts if they are glanced over without enforcement. For example, if we cover fractions at the beginning of the year and never return to them, students forget. Skills should be revisited regularly in a variety of contexts.
Repeated assignments help teachers evaluate the formation and retention of skills.
In this lesson, we will create a spreadsheet in Google Sheets to generate math practice assignments. The template is built around the basics. Those basics include addition, subtraction, multiplication, and division.
The generated assignments are transferred to a Google Sheet for distribution to students.
If you like this lesson please consider purchasing a PDF version. The purchase lets me know you like the lesson and it supports my efforts.
Purchase a printable PDF version of this lesson ($5.00)
Links to the finished products are available below.
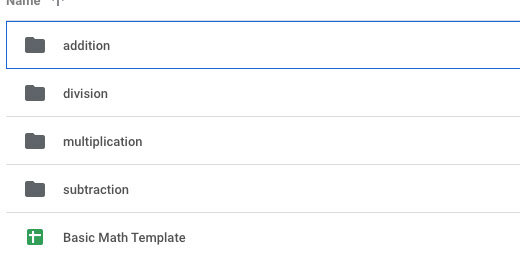
Preview and copy of the finished product(addition)
Preview and copy of the finished product(subtraction)
Preview and copy of the finished product(multiplication)
Preview and copy of the finished product(division)
Google Sheet Generator
Go to your Google Drive and create a folder to store the generator. Here is an example of what I do. I create an assignment folder. The assignment folder has a math folder. In that folder, I have my generator. This folder has folders for the eventual products created with the generator.
Create a spreadsheet. Set the name of the Sheet to Basic Math Generator.

The generator uses a function called RANDBETWEEN. This function selects a random number from a provided range. The range has a lower number and an upper number.
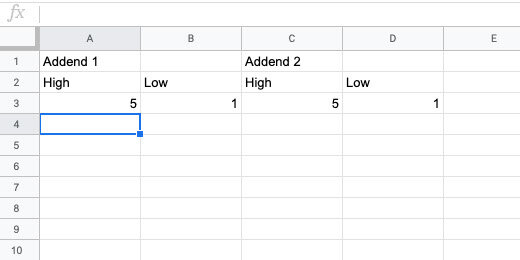
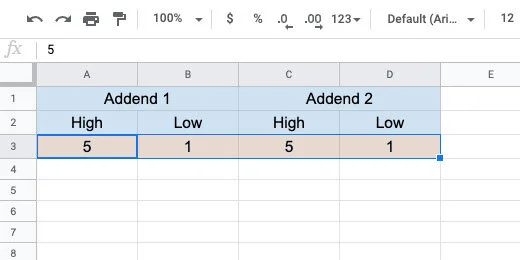
Type the title Addend 1 in cell A1. Type the title Addend 2 in cell C1. Type the titles High and Low in cells A2 and B2. Type the same titles in cells C2 and D2. Type the number 5 in cell A3 and the number 1 in cell B3. Type the same numbers in cells C3 and D3. We will begin with these numbers for our range.
Select cells A1 and B1.

Go to the button bar and click the merge button.

Repeat the process to merge cells C1 and D1.

Select the cells between A1 and D3.
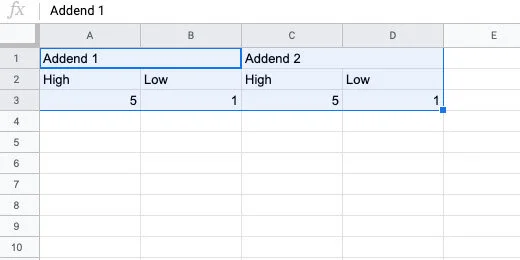
Go to the button bar and click the alignment selector. Choose the center align option.

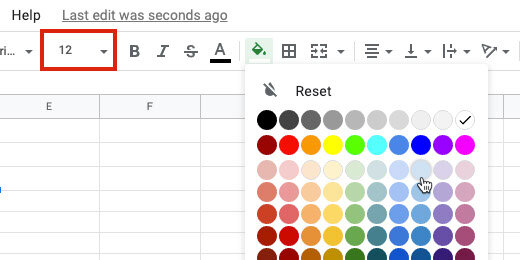
Change the font size to 12. Click the background selector tool. Select a light color.
Select cells A3 to D3. Change the background color. Use a color that compliments the first. I have chosen a light blue and orange. This makes the generator useful and pleasant to use.
Click the letter E for column E.

Click the border selector. Choose the left border option. Don’t move away from the selector yet.

Click the border thickness option. Choose the third option.

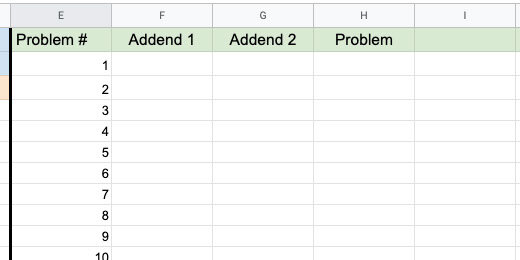
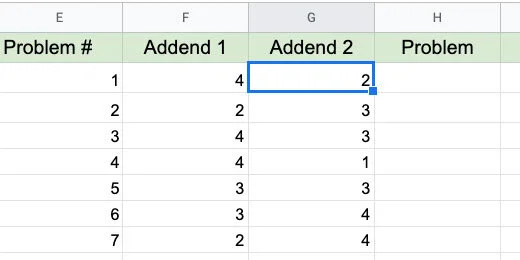
Type the titles Problem #, Addend 1, Addend 2, Problem and Sum in cells E1, F1, G1, H1, and I1. Set the font size to 12. Change the background of the cells. Use a light color. I choose a light green.

Type the numbers 1 through 20 down column E. Begin in cell E2.
Go to cell F2 and type the function below. The function selects a random number between the numbers in cells A3 and B3. The lowest number must be first. This is why the first cell reference points to B3. The dollar symbols set the cell reference to an absolute cell reference. Press the Return key to set the function.
=RANDBETWEEN($B$3,$A$3)
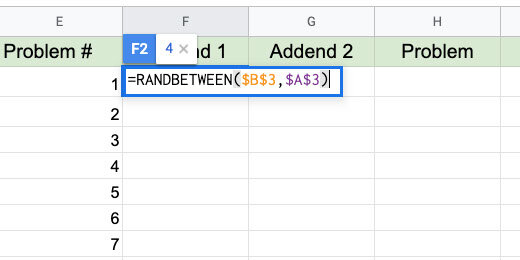
The number generated in my example appears in cell F2. Go back to cell F2. Look for the blue square in the lower right corner. Double click this square.

This copies the function down the column. This option works because there is content in the left column. It will copy the function as long as it encounters content in the left column. The copy process ends at number 20.

Go to cell G2. Type the function below into the cell.
=RANDBETWEEN($D$3,$C$3)
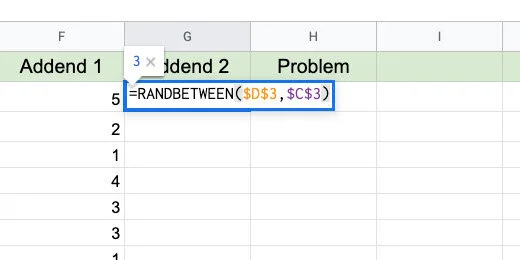
Double click the blue square to copy this function down the column.
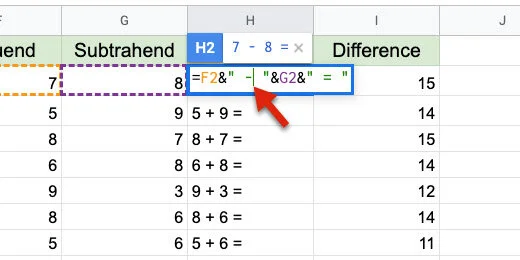
Go to cell H2 and type the formula below.
=F2&” + “&G2&” = “
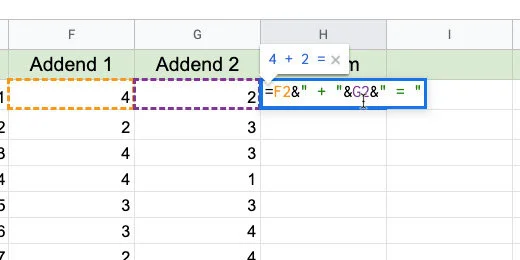
I refer to formula and function. A function has one purpose. A formula is a combination of functions and operations.
F2 references the number in that cell. The ampersand is used to join, concatenate, two functions, or formula. We can't use the add symbol by itself. It would just add the contents of the cells together. The quotation marks set the add symbol as text. There is space between the add symbol to make the problem easier to read. The Add symbol and space is concatenated with the number in cell G2. The equal sign with spaces is concatenated with G2.
Double click the blue square to copy the formula down the column.

Change the high and low numbers to adjust the difficulty of the problems. Use single or double digits. There is no limit. Use numbers of any size.

Go to cell I2 and enter the formula below. Double click the blue square.
=F2+G2

This is the basic addition problem generator. The rest of the generators are based on this one.
Subtraction
Double click the Sheet 1 name. Change the name to Addition.

Click the actions triangle next to the sheet name.
Select the Duplicate option.

Change the name of the duplicate sheet. Use Subtraction for the new name.

Change the names of the columns for the number ranges. The column names are Minuend and Subtrahend.
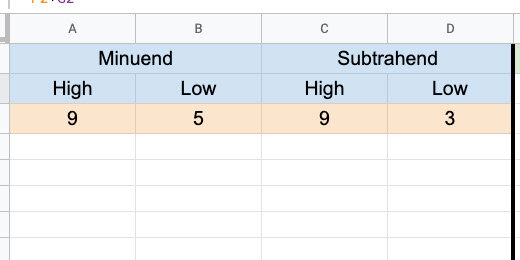
Update the heading in the generator section. Replace Sum with Difference.

Double click on H2. This places the cell in edit mode.

Replace the addition symbol with the subtraction symbol. Press the Return key to update the formula.
Click back onto cell H2. Drag the blue square down the column to update the rest of the cells. We can't double click the blue square this time.
Double click on cell I2. Change the addition to subtraction.

Drag the blue square down the column to update the rest of the cells.

Some of the answers are negative numbers.

To prevent negative numbers we need to change the range values. The range of values for the subtrahend must be smaller than those of the minuend.

Multiplication
Make a duplicate of the subtraction sheet. Change the name of the duplicate to Multiplication.

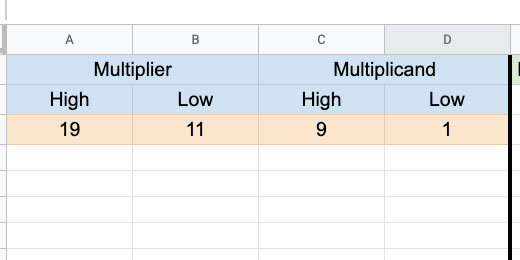
Change the titles for the ranges. Use Multiplier and Multiplicand. You can also use Factor 1 and Factor 2.
Update the titles in the generator section. Replace Difference with Product.

Double click cell H2. Replace the subtraction symbol with a letter x. Update the cells down the column.
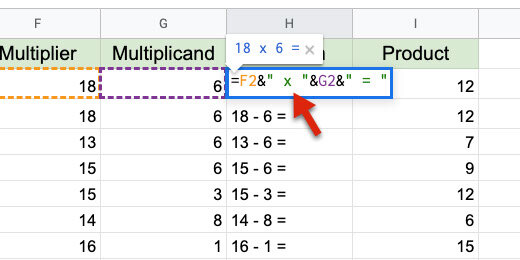
Double click cell I2. Change the subtraction operator with an asterisk. An asterisk is used to multiply values. Update the cells down the column.

That's all there is to the multiplication generator.
Sometimes we need to transition from the letter x for multiplication to the Dot symbol. This is how to use the dot symbol for multiplication.
Double click H2. Replace the addition symbol and the quotation marks with CHAR(8901). Update the cells down the column.
=F2&" "&CHAR(8901)&" "&G2&" = "
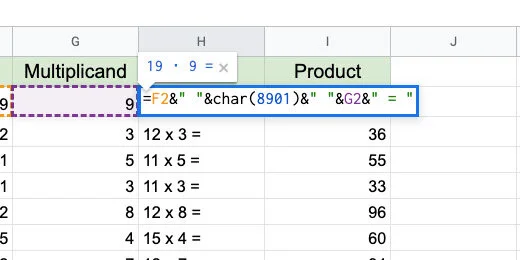
CHAR is a function. It uses Unicode values to generate almost any symbol. Every symbol available to computers is represented with a Unicode value. The value for the Dot multiplication operator is 8901. The quotation marks between the ampersand are used to add space.
The link below has a nice page with a visual reference for several math Unicode values.
http://xahlee.info/comp/unicode_math_operators.html
The dot symbol is in the Operators section. The value appears when we hover the mouse arrow over a symbol.

Division
Make a copy of the multiplication sheet. Change the name to Division. Update the titles for the ranges. The titles are Dividend and Divisor.

Update the titles on the Generator. Replace Product with Quotient.

Double click on cell H2. Update the formula with the formula below.
=F2&" "&char(247)&" "&G2&" = "
This is the same format used to replace the x with the Dot symbol for multiplication. If you used the dot symbol all you need to do is replace the code with 247. Update the cells below.

Double click on cell I2. Replace the asterisk with the forward slash. Update the cells down the row.

Most of the answers are in decimal format. Decimals are the remainder of the division problem. Remainders are often represented as fractions.

Fractions
Click on cell J1. Type the title Fraction. Update the cell background color.

Click in cell J2. Type =I2. This copies the contents of cell I2 into cell J2. Copy the formula to the cells down the column. Hint: double click the blue square.

Select all the cells below the Fraction title.

Click Format and go to the Number option.

Go to the bottom of the Number format options. Select Custom number format from the More formats option.

Type # ??/?? in the custom format bar. This builds a number format where a whole number replaces the # symbol. Decimal values are converted to fractions and formatted with ??/??. Each question mark represents a number. Click the Apply button.

The answers are represented as fractions.

Remainders
Before students use fractions, they use remainders. Click on cell K1. Type Remainder for the title. Change the cell background color. Update the font size and center the title.

Type the formula below into cell K2. Copy the formula to the cells down the column.
=ROUNDDOWN(J2,0)&" R "&MOD(F2,G2)

The ROUNDDOWN function rounds the decimal value. It gets the value in cell J2. The 0 is used for not decimal place value. We concatenate the letter R for the remainder within quotation marks. The MOD function is short for Modulus. Modulus determines the remainder in a division. To determine the remainder it needs to perform the division. It divides F2 by G2.

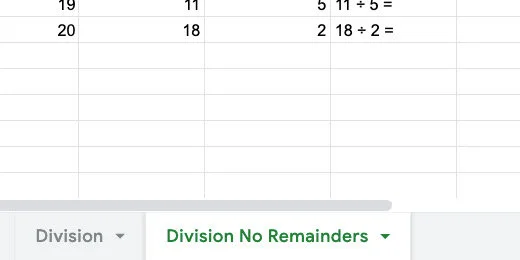
No Remainder
Most fractions have remainders. When students first learn division we avoid remainders. Division is usually taught along with multiplication. The relation of both operations is demonstrated with the back and forth of both operations.
Make a Duplicate of the Division sheet. Rename the sheet to Division No Remainders.
Double click cell F2. Add G2* after the equal sign. This multiplies the random number by the divisor. No remainders. Update the formulas down the column.

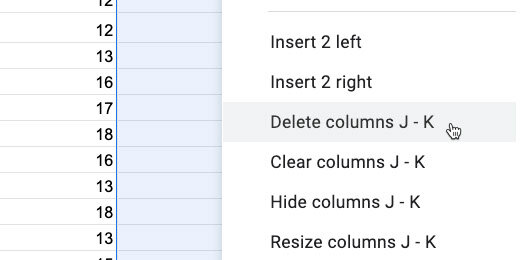
There isn’t a need for the fraction or remainder column. Select both columns.

Click the action triangle on one of the headers.

Select, Delete columns J-k.
The basic generators are complete. Let’s use them to create assignments.
Google Docs
Leave the generator sheet open. Go to Google Drive and create a new Google Document. Name the document Division with remainders 01.

Go to the menu and select Insert. Go to Headers & footers. Select Header.

Type the title "Division with Remainders 01". Provide instructions below the title. Use the Title paragraph style for the title. Set the instructions font size to 14 points. Press the return key twice to add some space. Click on the body of the document to close the Header section.

Return to the math generator sheet. Select the regular Division sheet. Select the first ten problems.

These are old problems. We can generate new problems on the sheet at any time. New problems are generated in several ways. They are generated when we open the spreadsheet when we refresh the page, and every minute through the settings.
There is an option I prefer. Click on the first cell for the first problem. Click and drag the blue square down to the number of problems you want to regenerate.

This regenerates all the problems and selects the problems we want for the assignment.

The answers are two columns over. To select the cells we need to use a modifier key. Windows and Chromebook users hold the Alt key. Mac users hold the Command key. Select the matching answers in the Remainder column.
Go to the menu. Click Edit and select Copy.

Go to the Google Document tab. Click Edit and select Paste without formatting.

Highlight the problems.

Change the font size to 18 points.

Click the line spacing selector and choose Double.

Click the Numbered Bullet list option with parenthesis.

Move the First line indent bar to the left. Stop when the indent is a 0.0.

Deselect the problems.

This is your teacher's master. We need a copy for the students. Go to the menu and click File. Select the option to make a copy.

Remove the "Copy of" from the beginning of the name. Add "for students" at the end of the document name. Click the OK button.

Delete the answers from the student version.

Repeat this process with any number of math assignments from the problem generator.
The mBot robot and basic motion
The mBot robot is useful when teaching math, science, and coding concepts. Once the robot is assembled we begin with the fundamentals. These fundamentals include coding the robot’s microcontroller to activate the motors so mBot moves.

Basic math, science, and coding concepts
I like using the mBot in the classroom. It is useful when teaching math, science, and coding concepts. Once the robot is assembled we begin with the fundamentals. These fundamentals include coding the robot’s microcontroller to activate the motors so mBot begins to move around. Once the robot is moving we begin to learn about motion, velocity, and acceleration. This leads to lessons on Newton’s Laws of Motion.
Make sure the robot is not on a table where it can easily roll off and come crashing to the floor. I recommend placing the robot on the floor for the first few examples. You can also place the robot on a small paperback book so the wheels are free to spin.
The application to program the mBot is available online or as a download for your computer or device. Go to https://mblock.cc. Programming in the browser version of mBlock 5 requires an account. There is account integration with Google so students can easily create their accounts. This is useful if your school district uses Google account services.
Create a new project by clicking the new project button on the startup page. Provide a title for the project. Click the word Untitled next to the image of a diskette.

Name the project “Move forward and back”. Don’t include the quotation marks.

We need to load the robot into the development environment. Loading the robot loads the code library for the robot. This code library provides some specific code blocks for mBot.
Go to the Devices section under the Stage and click the Add button. The button is next to the Cody Device.

A Device selector window will open. Click the mBot device and click the OK button.

There are two devices in the Devices section. The mBot device is selected. A blue highlight appears around the selected device.

The codes panel updates with the categories and code blocks for the mBot. The first code block in the Action category is used to instruct the robot to move forward.

Using code blocks to build scripts is easy and intuitive. Click and drag the first code block onto the canvas area on the right. This code block has two number values. These values are inside small ovals.

The move forward code block is used to send instructions to the micro-controller on the mBot. The micro-controller sends instructions to all the components on the board. It also sends instructions to the components attached to the board.
The micro-controller interprets the instructions in the code block. The instructions in the current code block will send fifty-percent of the available energy to the motors. It will send this amount of energy for one second. That isn’t much time. We will change these values later.
STEM Integration
Let’s take a closer look. The code here relates to some basic concepts in science. The mBot has a battery pack. It uses four double-A batteries. Each battery is 1.5 volts. There are four of these batteries. That is a combined voltage of 6 volts. Volts are potential energy. Potential energy is a concept covered in physical science.
The code block instructs the micro-controller to send fifty-percent of this potential energy to the motors. The energy is released as current. Current is the flow of electrons from one end of a circuit to another. We can determine the current sent to the motors with a math formula. This formula is taken from
Ohm’s law. Ohm’s law is a formula used to calculate current, resistance, or voltage in a circuit. To determine the current sent through a circuit, we divide the voltage by the amount of resistance in a circuit.
We don’t need to know the exact amount of current sent to the motors. It is enough that we use this moment to apply classroom concepts to real-world applications. We must use the proper academic language.
Through the use of this model, we show students potential energy at work. They understand that the current is flowing through the motors to move the robot. They understand that one form of energy is being converted into another form.
There is another concept that we can teach with math and science. That concept is time. Using the code block, we send current to the motors for one second. We will change this value later to something more reasonable. It is important to note that the code does not have instructions for values that relate to miles per hour or even feet per minute. The values have nothing to do with the measurement of distance.
The values relate to energy and time. These two concepts are closely related to concepts taught in astronomy, physical science, and math. In space, distance is commonly measured in time. For example, the distance from the earth to the sun is 92.96 million miles or 146 million kilometers. Light takes 499 seconds to travel from the sun to the Earth. We call this One Astronomical unit. Light travels at 186,287 miles per second or 299,792 kilometers per second.
There are lots of numbers used to describe the distance from the Sun to the Earth. We can easily get confused when using miles or kilometers. How do we know the sun is that far away from the Earth? Did someone travel there to measure? Did we have a very long measuring tape? We used the constant speed of light to help find the distance. For the most part, light always travels at the same velocity. It is the same almost everywhere we measure. Light is constant. This makes the use of light a reliable measuring tool.
Light is measured in the amount of time it takes to travel from one place to another. The Sun is 499 light seconds from the Earth. The distance to the closest star system is 4.22 light-years. That is about 25 trillion miles or 40 trillion kilometers. A trillion is a number followed by 12 zeros. Time might be easier to understand.
We measure distance in time all the TIME! How long does it take to travel from your city or home town to another city? When children are fussing in the back seat they don’t ask, how many more kilometers ’til we get home? They as when are we getting there. They are already measuring distances in time.
Time is a central part of calculating velocity and acceleration. To determine velocity and acceleration we need a change in time and a change in position. The change in position is the distance traveled from one point to another. The calculation of force requires the calculation of acceleration. Acceleration is part of velocity.
We have strayed far away from the code for the robot. That is part of the point. We can extend and integrate a variety of concepts when using robots for STEM. Coding the robot is a means to an end.
Returning to the code
Let’s get back to the code block. This simple code instruction will help students learn and understand some principles of motion. Students will adjust the code parameters to learn and understand velocity and acceleration.
Update the code block so the mBot travels at half the potential energy for 3 seconds.

To upload the code we need to go through a few steps. Connect one end of the USB cable to the mBot. Connect the other end to the USB port on your computer. Turn the mBot ON. Make sure to hold the mBot. Sometimes the mBot wheels will begin to spin. My students often lay the mBot on its back. This leaves their hands free to work with the application and the upload process.
The mBot wheels will roll because it begins to process the instructions in any code uploaded to it from a previous session. The code is saved in the mCore memory. The code in this memory is executed each time the robot is turned on. This is common with devices that have Microcontrollers. The code is cleared out by new code uploaded or by updating the Firmware.
Click the Events category. The code blocks in this category are used to start our instructions. These are conditions that need to be met before the mBot will begin executing the instructions. Some of the conditions include the clicking of a green flag and the press of the space key. These conditions are often used with Scratch and the development of interactive stories and games. These conditions don’t work well with our robot.
The condition block we need is the first one. When mBot(more) starts up. This block is grey. This means the block cannot be selected. We cannot add it to the canvas while it is grey. How can we select it then?
We are currently in test mode. Test mode does not actively connect to the mBot. We need to exit Test mode.

Go to the bottom of the application and look for the Connect button. Above the button is an option for live or upload mode. Click the switch to change to upload mode.

The mBot condition block is now available. The condition blocks for the Scratch development environment are grey. This means they are not available for our robot.

Attach the mBot condition code block to the move code on the canvas.

We need to open a communication link to the mBot from the program. This will allow us to upload the code to the robot. Go to the bottom of the application and click the Connect button.
Uploading is when we send content from our computer to another. We download when we get content from another computer.

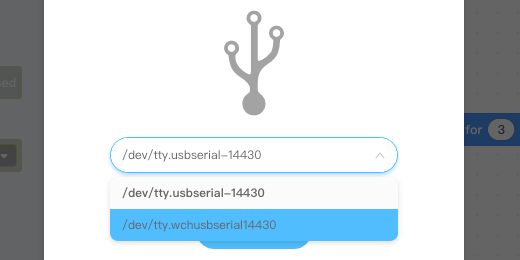
A connection configuration box will open. This configuration box is used to select the USB communication port connected to the robot. The port will be different on Windows and Mac computers. The image below shows the connection port on a Mac computer. The connection is being directed to one of the USB ports.
The connection port on Windows is usually Com3. It can also be Com1 or Com2. Com stands for Communication.

Click the port selector. The available communication ports will be listed. The communication port for the mBot on Mac has a special name. This port is /dev/tty.wchusbserial. The number after the name will depend on your Mac. The important part of the information is “wch”. This identifies the port that communicates with the mBot. Select this port.
Click the connect button.

A new button appears below the Test button. The connect button changes to Disconnect. Above the Disconnect button is a button to upload our code to the mBot. Click the button to begin the upload process. Make sure the robot will not roll off a table before doing this!

The mBlock software will compile our instructions. This means the program is checking our instructions for mistakes. It is also converting our instructions into instructions the mCore board understands. The compilation process is both a code checker and a translator.

The instructions are uploaded after the compilation process is complete. A progress bar will show the upload progress. The upload is usually quick. The mBot will run our instructions once the upload is complete.

Turn the robot off. Unplug the cable from the mBot. Leave the other end connected to the computer. We will be returning often to update the code. Each time we update the code it must be compiled and uploaded.
Set the robot on the floor and turn the power switch On. The robot will run the code again. It will do this every time we turn the mBot On.
Sphero's weight, mass, and density
Sphero is a physical object. It has a mass and it has weight. We will use mass to determine buoyancy. Yes, Sphero floats.

The Science
Sphero is a physical object. It has mass and it has weight. We will use mass to determine buoyancy. Yes, Sphero floats.
Mass is the amount of matter an object has. The mass of an object remains the same or constant.
The weight of an object is the affect of gravity on an object. The weight depends on the gravity. The gravity on Earth is constant for our purposes. Gravity is affected by altitude on Earth. There is a close connection between mass and weight but they are two separate things.
Gravity relies on the mass of the Earth. It also relies on the elevation of the object weighed. Objects on the surface of the earth feel a greater pull by gravity. Objects in orbit around the earth, like a satellite, don’t feel the pull of gravity as much. This is why objects in space are said to be weightless.
An astronaut on earth could weigh about 200 pounds. In space that same astronaut’s weight can’t be measured. This is because there is not gravity to push down on the weight scale.
This is what makes mass different from weight. The astronaut has not changed. His or her matter has remained the same. Everything is made of matter. Some matter is light and some is heavy. The measurement of this amount of matter is called mass. The more matter something has the greater it’s mass.
Sphero’s Weight
There are a variety of ways to weigh Sphero. The easiest is to use a kitchen scale. Sphero comes with a base for charging. We will use this base to prevent it from rolling off the scale. Get yourself a kitchen scale. Turn on the kitchen scale and place the charging base on the scale. The scale will read the weight of the charging base.

We need to subtract this weight. There are a couple of ways to do this. The most obvious way is to take the base weight and subtract it from the total weight after adding the Sphero. Another way to eliminate the base weight is to use the Tare option on the scale. Most modern kitchen scales have this option. There is usually a button on the scale that reads Tare.
To use the Tare, press the Tare button on the scale. The scale will eliminate the base’s weight and display a zero. Just like the base was not on the scale.

Place Sphero on the base and read the weight on the scale. In Standard measurement, Sphero weighs approximately 6.35 ounces. In the Metric System, Sphero weighs 180 grams.

Sphero’s mass is 180 grams. The scale compensates for Earth’s gravity. Earth has a constant gravitational pull of 9.807 meters per second squared. The scale eliminates this force from our value.
A Balance scale
Let’s use a balance scale to check our value. Balance scales are used to measure mass. We use a balance scale to measure the mass of one object with the mass of another. We place one object on one side of the scale. On the other side we place objects that have a known mass. The objects are usually metal weights.

The mass of the weights is marked on each. We place enough of these weights until the scale is balanced. The total mass placed on the scale is used as a measure of the mass on the other side.

The the value of the weights placed on the other side of the balance total 180 grams. This agrees with the value from the kitchen scale.
This is part of the scientific process. We take measurements and then we need to verify those measurements. If the measurements are different then we need to understand why.
Buoyancy and Density
We know that Sphero floats. It is water tight. Make sure there are not cracks on your Sphero. These lessons cover buoyancy, density, and water displacement.The buoyancy of something depends on its density. Water has a density of 1. Objects that have a density greater than one will sink. Objects that have a density less than one will float. We will calculate the density of Sphero in a moment.
First, we need to know how we arrived at the density of water. Place a beaker on the kitchen scale. Press the Tare button to set the scale to zero. Pour 250 mL of water into the beaker. Read the measurement on the scale. Make sure the measurement units are in grams. The measurement is the same as the amount of milliliters we placed in the beaker.
To determine the density of water we divide the mass by the volume. The volume in milliliters is 250. The mass in grams is 250. The answer is one. The density of water is one.
Sphero’s Density
Sphero is enclosed in a plastic sphere. We will place Sphero into water and use it to learn about buoyancy and density. Buoyancy is the capacity for something to float. The density of an object has much to do with its ability to float.
We need a container with water. The container needs to have a way for us to measure the amount of water. A beaker is a good container to use if you have one large enough. I find that a two-cup kitchen measuring cup works well if a beaker isn't available. These measuring cups are available at any discount store for a few dollars. They have a nice handle to hold onto.

Fill the container to the one-cup measurement. Add some food coloring to help you see the water level if necessary.

Insert Sphero into the measuring cup. Sphero displaces the water in the measuring cup. Sphero forces the water up and around the measuring cup. The water level rises to one-and-three-quarter cups. Sphero displaces three-quarters of a cup of water.

Sphero doesn't completely float and it doesn't completely sink either. This is due to Sphero’s density.
To find the density of an object we need to divide the mass of the object by the volume. This is where all the math we did earlier comes together.
Sphero has a mass of 180 grams. It has a volume of 180 cubic centimeters. Sphero’s density is One! This is the same density as that of water. This explains why most of Sphero is submerged in water. Much like an iceberg.
All the science we just did would not be possible without the math we used in the previous lessons. This is that math science connection we are always wanting to make with students.