Measuring angles with a protractor in Google Drawings
Introduction
In this lesson, we are creating graphics for geometry angle assignments. The images are used by students to measure angles. Students use the image of a protractor to help them measure these angles.
The angles we are using here are based on a previous lesson. Use the link below to review that lesson.
I am providing the finished product links below. Use them if you don’t want to create the angles from scratch. Each link creates a copy of the angle in your Google Drive.
The angles are available on my Teacher Pay Teacher storefront. They are free. The link to the storefront is available below this paragraph. I encourage you to follow along in the lesson. The point of the lesson is to learn new skills.
Create basic angles with Google Drawings
The protractor
Students need a protractor to measure the angles. There is a free image resource available from Wikimedia Commons. This image is in the public domain. The link to the image on Wikimedia is available below. I also have a copy of the protractor available in a Google Drawing.
Don't download the image from the Wikimedia page. We will use the link to directly insert the image into a drawing.
https://upload.wikimedia.org/wikipedia/commons/5/5b/Gradeboog1.png
Vocabulary
Geometry and angles have their own set of vocabulary. Here are the terms used in this lesson.
Vertex is the point where line segments meet at an angle.
An arm is a term used for the lines of an angle.
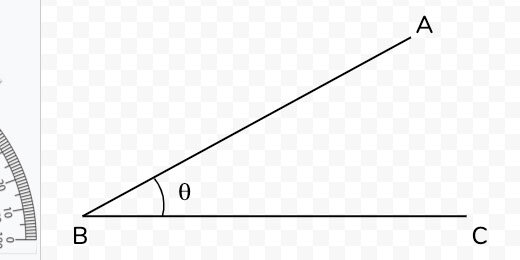
An angle is where the arms meet in a vertex.
An initial side is an arm that lies flat on the x-axis.
The Terminal side is the arm that is opposite the initial side.
Theta is the symbol used for angles.
Acute angles
Open the acute angle drawing. Use the link above to get a copy. Make a copy of the Drawing. Click File and select Make a copy.

Set the name of the copy to 15-degree angle. Click the OK button.

The image in the drawing is grouped. I recommend grouping the objects to prevent students from accidentally moving objects out of place. We need to ungroup the objects to create the angle.
Click once on one of the lines. Click Arrange and select Ungroup.
Press the ESC key on your keyboard or click once outside the angle to deselect the objects. Click on the Terminal arm.

We are going to change the angle of the line. To change the angle we need to rotate it to 90-degrees. Click and drag the terminal line endpoint to the left. We want the line to be straight up and down. Hold the Shift key will moving the endpoint. This forces the line into a perfectly vertical position.

The line needs to be at a 90-degree angle.

Hold the Shift key and drag the line endpoint to the right. The line will snap as you move it to the right. The line snaps at 15-degree increments.

Keep moving the endpoint down. Stop when the line snaps to a point before it reaches the initial arm.

This is our 15-degree angle. We need to clean up the letters and symbols. Select the arc symbol. Move the top arc endpoint toward the terminal arm. Use the plus symbol to align the endpoint.

Reposition the letters and the Theta symbol.

Draw a selection around all the objects. Click Arrange and select Group.
Move the angle toward the center of the canvas. Use the alignment guides to center the angle.
The protractor
We need to supply the protractor for students to use. Go to the beginning of this lesson and copy the link to the image.
Click Insert and go to the Image option. Select the option to insert an image by URL.

Paste the link into the URL box. The image of the protract appears in the preview box. Click the Insert button.

Measuring the angle
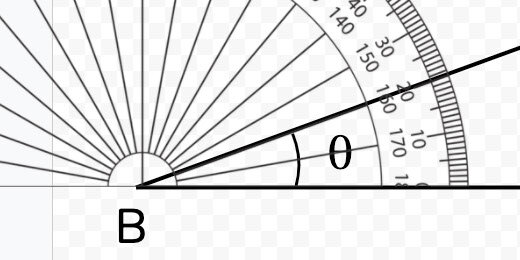
This is what students will do. Drag the protractor so the 90-degree mark is at the vertex. The image disappears as we drag it. Place the image close to the vertex. Use the up, down, left, and right arrow keys to position the image.

The terminal line lies on the 15-degree mark.

Adjusting the protractor
The protractor and the line are the same color. It might be difficult for some students to determine the reading.
Select the protractor image. Click the Format options button. Select the Recolor section.

Click the recolor selector. Choose a color.

The color provides added contrast.

There is another option to increase contrast. Open the Adjustments section. Move the transparency slider to the right. Move it somewhere close to the midway position.

The terminal line of the angle is easier to see.

Place the protractor to one side of the drawing. Students will drag it onto the drawing.

Distribute a copy of the angle to students using Google Classroom.
More angles
There are many more angle options. Make a copy of this drawing. Set the name of the copy to 30-degree angle.
Select the angle and ungroup the objects. Click the terminal line endpoint. Hold the Shift key. Move the endpoint up and to the left. It will snap to the next 15-degree point.
Adjust the letter for the endpoint. Move the endpoint for the arc to meet up with the terminal line. Adjust the Theta symbol. Select all the objects and group them. This prevents students from accidentally moving the objects separately.
Different angles
We have been making angles with increments of 15-degrees. Let’s make an angle for 20-degrees.
Make a copy of the drawing. Set the name to 20-degree angle. Select the angle and ungroup the shapes. Select the terminal line. Open the Format options panel. Select the Size & rotation option.
The shape can only be rotated clockwise. Shapes are always set to zero degrees when created. Rotating a shape counterclockwise is not possible using the rotation setting.
The terminal line is 30-degrees from the initial line. Rotate the angle 10-degrees to return to 20-degrees.

The shape rotates about the center. This causes the endpoint to move from its connection with the initial line.

Drag the rotated line down until the endpoint aligns with the initial line.

Adjust the arc and move the Theta symbol.
Move the protractor image in and measure the angle.
Move the protractor back to where it was.
Draw a selection around the objects. Group the objects. Center the angle on the canvas.
More angle options
I like to begin with the right angle for most angles. Make a copy of the angle we created. Name the new drawing 60-degrees. Ungroup the angle. Select the terminal line. Drag the top endpoint to the left. Use the shift key to form a vertical line.

Open the Format options panel. Open the Size & Rotation section. To create a 60-degree angle we need to subtract the difference from 90-degrees. That gives us 30-degrees. Enter 30-degrees in the degrees field.

Move the terminal angle and align it with the initial line endpoint.

Adjust the arc and reposition all the text boxes.

Obtuse angles
We create obtuse angles using the same process. We need an obtuse angle to get started. Use the link below to get a copy of a basic obtuse angle drawing.
Get a copy of the obtuse angle.
Make a copy of the angle. Name the copy 140-degree angle. Ungroup the objects. Select the terminal line.
Move the top endpoint so the line is horizontal. Remember to use the Shift key.

Click the Format options button. Open the Size & Rotate section. We need to subtract 140-degrees from 180. This leaves 40-degrees. Enter 40-degrees in the angle field. Move the line and align it with the horizontal line endpoint.

Rearrange the text boxes. Group all the objects and center the angle on the drawing canvas.

The process isn't too difficult. I hope you find these instructions useful.