
Technology lessons for educational technology integration in the classroom. Content for teachers and students.
Publishing Google Charts with Google Slides
Google Slides is a good way to publish graphs that are constantly updating. This works well when gathering data through polls and surveys. This is the type of data we are representing in the charts for this lesson. The data in this lesson comes from something we did to increase attendance at the campus.

Introduction
This is the fourth lesson in the four-part series on publishing Google Charts. This lesson focuses on the publication of charts using Google Slides.
Google Slides is a good way to publish graphs that are constantly updating. This works well when gathering data through polls and surveys. This is the type of data we are representing in the charts for this lesson. The data in this lesson comes from something we did to increase attendance at the campus.
The administrator promised a pizza party —for the holiday— to classrooms with the highest attendance. Each class kept a record of their daily attendance. We created a Google Form to collect the attendance for each day.
Each class form was simple. Every teacher had a personal form. The goal was to keep it simple. The teacher entered the number present and submitted it. We took care of gathering and formatting the data in the background.
The contest was part of a lesson. Everything is a teachable moment. Students learned about gathering data, and basic statistics. We focused on the average attendance value. This worked out in an interesting way when students wanted to come to school even if they were sick.
We worked out how one student doesn't affect the average as much as five or more. They learned how important it was for one student to stay home sick instead of infecting other students and increasing the number of possible absences. It's amazing what kids will do for a pizza party.
Resources
Use the link below to see a preview of the final product.
I have gathered all the data and formatted the charts in Google Sheet. Use the link below to get a copy of the working documents.
Data and chart overview
The Google Sheets document has the data and charts formatted for our project. The spreadsheet has one sheet dedicated to each grade level. The last sheet contains all the form data for each teacher’s class.
Each sheet has a table. The table contains the average for each teacher’s attendance. These averages are used to generate the charts.

The columns in each chart are color-coded to identify each teacher's class.

The attendance data updates every day during the contest. We can't have access to live data for the lesson so I did the next best thing. The Kinder sheet has a Date filter. This filter represents the dates for the attendance contest. Select a date and the data for that day and the previous days are averaged. Select August 21st, 2020.

The charts on each sheet update with the selected date range.

Preparing the slides
Switch to the Google Slides template. The template has one slide. This slide is based on a slide master created for this project.

Go to the menu and click Insert. Go to the Chart option and select From Sheets.
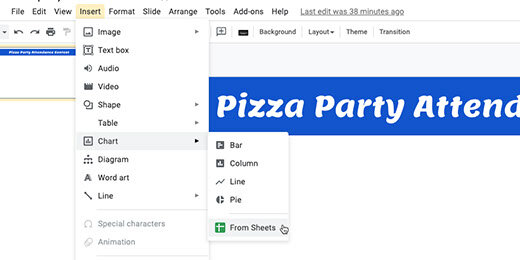
Find the Attendance Chart sheet. Click on the sheet icon and click the Select button.

Each chart in the sheet is detected and displayed. Click on the Kinder attendance chart.

Each chart is linked to the spreadsheet. This link updates the chart as the data in each sheet updates. We will see how this works later. Click the Import button.

Position the chart so it fills the slide. Don’t worry if the chart stretches.

Click the Insert slide selector.

The template has a master slide with the reformatted heading. Select this slide master.

Insert the next chart. Go to the menu and select Insert. Go to the chart option and select From Sheets. Select the attendance spreadsheet. Find the First-grade chart and insert it into the slide. Resize the chart to fit. Repeat this process with all the charts.

The data in my current chart for Kinder represents the first week’s attendance. This is true for all the other charts. This represents the selector choice I made a few steps ago.

Return to the Sheets tab. Use the date filter and select August 28, 2020.

The chart updates with the data from the dates.

Return to the Google Slides tab. The chart in the kinder chart has an update button; click the button.

The chart updates and matches the chart in the Sheet.

The chart on each slide needs to be updated. Go to the First-grade chart and click the update button.

Updating each chart on each slide is tedious. There is a faster way to update all the charts at once. Go to the menu and click Tools; select the Linked objects option.

A panel opens on the right. It lists objects with links to external sources. Each link has an update button.

We can click each update button but there is a faster way to update all the charts. There is a button at the bottom of the panel to update all the linked objects; click the button.

There is a way to automatically update all the charts. That requires the creation of a Google Script. That takes us beyond the objective of this lesson.
Publishing
Everything is ready for publication. Go to the menu and click File; select publish to the web.

The link configuration box has several auto-advance options. The default is three seconds. Use the selector to choose how long each slide will display before advancing to the next. I like to leave it at three-seconds unless there is a lot of information to present.
Select the option to start the slideshow as soon as the player loads. Select the option to restart the slideshow after the last slide. Click the Publish button.

Click the Ok button to confirm the publication.

A special publication link is created. Copy the link.

Create a new tab and paste the link. Press the Return key to view the published slide show. The presentation begins moving from slide to slide as soon as the page loads.

Adjust the timing
The three-second default might be too fast. To adjust the timing we need to return to the publication settings. Choose a different time interval.

The link updates with the new setting. Copy the link. Return to the tab with the slide. Replace the link with the updated version.

Another way to update the setting is to go directly to the link. The end of the link has a number. This number represents the number of seconds for each slide. The number represents milliseconds. 5000 or 5 milliseconds in my example. Set this value to any value you want. Here are some examples: 5500 is five-and-a-half seconds, 7000 is seven seconds, and 60000 is one minute.

Use this link to publish the live charts.
Stop publishing
It is a good idea to stop publishing live charts when they are no longer needed. Return to the Google Slides tab. Click the Published content & settings option. Click the Stop publishing button when you are done with the project.

Google Slides for distance learning
Google Slides provides a variety of presentation options. Most of these options are available because it is a native web application. The presentation options lend themselves very well to distance learning. Students members get a copy of the presentation and presenter notes. This is also very useful as a distance learning resource.

Introduction
Google Slides provides a variety of presentation options. Most of these options are available because it is a native web application. The presentation options lend themselves very well to distance learning. Students members get a copy of the presentation and presenter notes. This is also very useful as a distance learning resource.
In this lesson, we are going to share a presentation with students. We will use the Q&A option to collect audience questions and get feedback.
Sharing presentations
Sharing presentations with Google Slides provides flexibility for teachers and learners. Teachers share their presentations with students. Students follow along with the presentation using their device. Teachers don't need a presentation screen. This is useful in traditional classrooms and distance learning.
Presenter notes and links are available to students. Updates to the presentation are immediately available to everyone.
There are various ways to share Google Slides. I prefer to share them on a Google Site. Before we get to that, I want to show you other ways to share presentations with students.
Open a slide presentation and click the Share button.
Google Slide share button
Click Get shareable link.
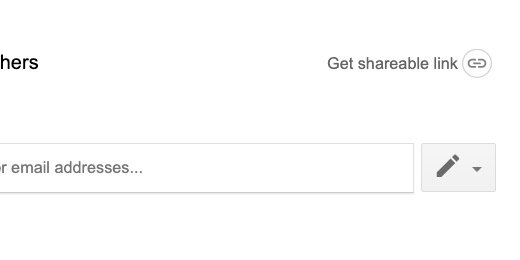
Get shareable link
There are various ways to share the link with students. For example, share the link through email or social media. The link provides view-only access. They won't be able to make any changes to the presentation.
Google Classroom is a better way to share presentations with students.

Shareable link with as view only
Google classroom is not just for students. Use it in professional development environments. I use it all the time.
Sharing with Google Classroom
Go to an existing Google Classroom you created or create one. Click the Classwork section.

Google Classroom Classwork section
Click the create button. The slide can be shared as an assignment, quiz, or question. When using it for a presentation I like to share it as classroom Material.

Create Material option
Provide a title. Include a brief description of the slide if you can.

Title and description for material
Click the Add button and select Google Drive.

Add content from Google Drive
Find the slide and double click to add the resource.

Select the Google Slide to share
Click the Topic selector. Create a topic for the material. Topics provide a useful way for students to quickly access materials.

Create a topic for the resource
I create topics with subtopics. The subtopic appears after the vertical bar.

A topic with subtopics separated by bar
Click the Post button. Students will find the material resource in the Stream Section.

Post button for material
The presentation opens in a tab when students click the shared link. It doesn't open in presentation mode. Students click the Present button to view the slides as a presentation.

Google Slide open in view only mode
Sharing with Google Sites
Google sites is another way to share material with students. Google Sites is a wonderful companion to Google Classroom. It forms the trilogy of Google Classroom, Drive, and Sites. I use a Google Site as part of my classroom resource. The link for the site is one of the resources in my Google Classroom.

Google Site shared as resource in Google Classroom
The slide is embedded in the site under one of the resource pages. The embedded slide provides a good visual for students. The first slide provides the thumbnail. The first slide should, therefore, include the title and relevant information.

Embedded Google Slide in Google Site page
This is how I embed the slide. Select a page where the slide will reside. Go to the Insert section.
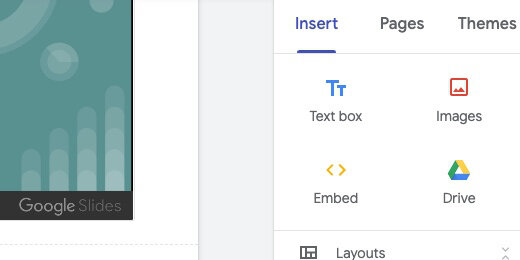
Insert panel in Google Sites
The embed slides option is near the bottom of the insert list. I prefer to use this option because it filters for Slides.

Insert Slides option
Select one or more slides and click the Insert button.
Select Google Slide for embed
Each slide is placed in a separate row.

Google Slide on site page
Click and drag slides around the page to place them side by side.

Drag and drop slide to reposition
Click the Preview button.

Preview the Google Site page
Students interact with the slide through the controls in the thumbnail. They move forward and back through the slides. They jump to a slide using the selector.

Control options on Slide preview
The full screen button displays the presentation on the device's display. It opens in presentation mode.

Full screen button on Google Slide preview
The pop-out button opens the slide in another tab. The slide opens in presentation mode.

Open in tab button
Questions and Answers
Google Slides has a Question and Answer option. It is typically used by the audience to ask questions of the speaker. The speaker then answers the questions after the presentation.
In the classroom, I often reverse the process. During the presentation, I ask questions or feedback from students.
Click the selector next to the presentation button. Select the first option.

Present with Q&A option
A tab opens with the slide thumbnail in a panel on the left. Speaker notes are available on the right. Click the Audience tools tab.

Q&A page for presentation
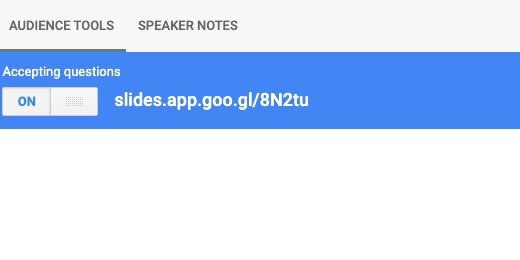
Click the Start new button at the bottom of the page.

Start at new Q&A session
The presentation is now accepting questions. A link to the questions page is provided. This link is shared with the audience on the slide.

Link to Q&A page for slide
The link appears above the slides. Students click the link to open the Q&A page.

Q&A link above each slide
Questions and comments
Students are presented with a question box.

Ask a question box
The student's name is included in the question. There is an anonymous option for shy students.

Question includes user name or send anonymously
Students click the submit button to submit their questions or feedback.

Submit button for question or comment
The question appears on the page for all students to view. The question includes like and dislikes buttons. Students with the same question click the like button. This helps you address the question that is most on student's minds.

Like or dislikes button for question
We see the question and the number of likes. The question has two likes. This does not include the original post. That makes three students that have the same question. Note that the name of the original poster of the question is the only name that appears.

Present button to display question for audience
Each question includes a PRESENT button. This button displays the question over the current slide. Click the button and take a look at the live presentation.

Question displayed over slide
Click the next Present button to display the next question. The previous question is hidden. Click the hide button to stop displaying a question.

Hide button to hide question after responding
Student feedback
Students are not the only ones that can ask questions. Use the link to pose your questions.

Teacher asking for feedback with question
This is a good way to get feedback for a formative assessment. I like asking true/false questions. Students "like" if it is true or "dislike" if it is false.

Question posed as true or false
Use the Present button to display the question for students.

Teacher question displayed for students
Stop accepting questions
The question page remains active. This is true if you close the presentation and the browser. Students can still post questions. I recommend you always close the Q&A session. Toggle the question session to off.

Stop accepting questions button
Reviewing the Q&A sessions
The Q&A session is saved with the slide. It is saved in the audience tools tab. Go into presentation mode and select the Q&A option.

Presenter view with Q&A
Click the Continue recent button.

Continue recent Q&A session button
All the Q&A sessions are listed. Click the continue button for a saved session.

Continue button to view or continue previous Q&A session
The session opens and is activated to begin receiving responses.

Q&A session is automatically enabled
Multiple Q&A
Teachers with multiple periods are likely to present the same information multiple times. This is where we can start a new session. Click the Start new session button.

Start multiple Q&A sessions with Start new button
Each Q&A session has its own unique Q&A link.
Each Q&A session has a separate Q&A link
The date and time for each session are saved and listed in the Recent sessions list.

Each session with date and post time